“`html
What Causes Raised Grain and Why It Happens
I discovered raised grain the hard way — finished my first walnut dresser, applied stain, and watched the entire surface turn fuzzy under the brush. How to fix raised grain after sanding wood became my obsession for three days straight. Turns out, I’d skipped a step that could have saved me twelve hours of frustrating re-work.
Raised grain happens because wood fibers absorb moisture. During sanding, you’re not just cutting the surface smooth — you’re also creating fresh, exposed wood cell structures that act like tiny sponges. When humidity in your shop spikes, or when you apply a water-based stain or finish, those fibers swell. Then they dry, but instead of lying flat where you sanded them, they stay standing upright.
The mechanics are simple. Wood moves. It always has.
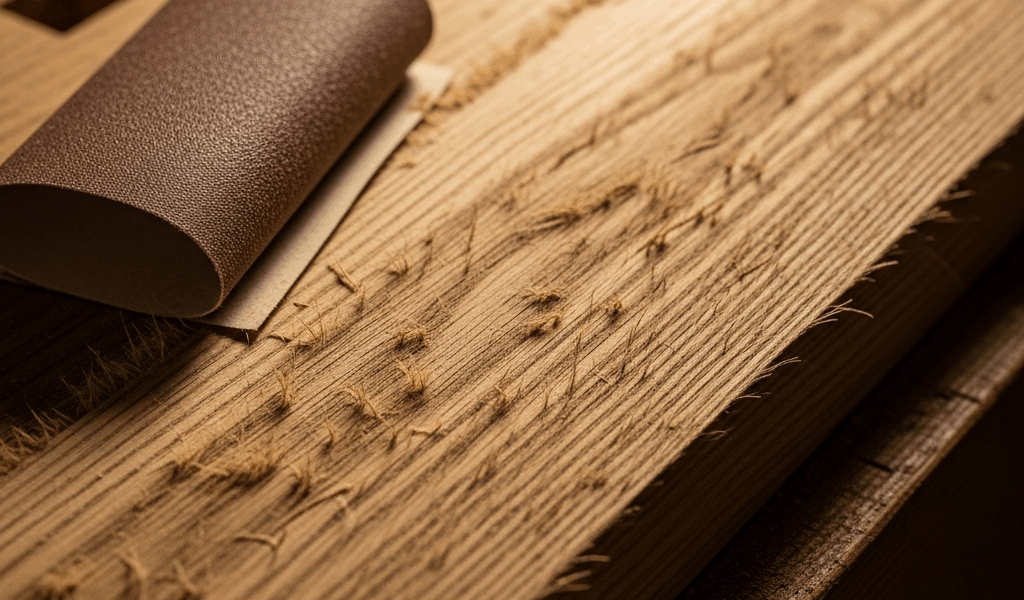
When you sand, you’re opening the grain structure. Your 120-grit paper removes material, but it also exposes fresh cellular walls. These walls contain lignin and cellulose that haven’t faced air or humidity in decades — maybe ever. Add moisture, even from atmospheric humidity alone, and those fibers expand perpendicular to the grain direction. The swelling is usually only 1-3 millimeters vertically, but that’s enough to feel like sandpaper under your hand.
Different woods raise grain differently. Oak, ash, and open-grained species do it aggressively. I’ve resanded oak tabletops three times because I underestimated how dramatically humidity swings affect them. Hardwoods with tighter grain — cherry, maple, walnut — raise grain less obviously, but they still do it. Softwoods like pine and fir are actually more forgiving than you’d think, though they sand rougher to begin with.
The worst part? Raised grain doesn’t announce itself until you’re already committing to finish. You sand to 220 grit, vacuum, tack cloth the dust away, and everything feels perfect. Then you brush on your first coat of water-based poly or oil stain, and suddenly the surface feels like you grabbed it with 80-grit paper. Now you’re either starting the whole sanding process over, or you’re trying to fix it without removing too much wood and creating low spots.
Prevention During the Sanding Process
The grain-raising technique that actually works is counterintuitive — you deliberately raise the grain before you do your final sanding. Yes, intentionally.
Here’s what I do now: After my initial stock removal and shaping (everything through 80 or 100 grit), I dampen the entire surface with a clean, barely-wet sponge or cloth. Not soaked. Barely damp. I’m shooting for the wood to look slightly darker, like it’s just been lightly misted. Then I let it dry completely — usually overnight in controlled humidity, or 4-6 hours in a warm shop. This pre-raises all the grain fibers at once, under controlled conditions, before my finish work grits.
Once that grain stands up from the initial damp treatment, I sand it back down with 120-grit paper, moving with the grain direction. This removes the standing fibers and seals the wood’s cellular structure. After that, when I apply water-based finishes or stains, the grain won’t raise noticeably because I’ve already exhausted that moisture-swelling capacity.
The grit sequence matters here. I’m not trying to refine the surface at that 120-grit step — I’m just knocking down the raised fibers. Then I move to 150, then 180, then 220 if I’m finishing with something that demands it. Each step progressively smooths what the previous grit left behind. Skipping directly from 100 to 220 after grain-raising defeats the purpose — those mid-range grits (120-180) are doing the actual work of preparing for the finish.
Shop humidity control helps too, though it’s not a perfect solution on its own. If I’m sanding during a humid day and finishing in a dry climate, grain-raising will still happen because the moisture gradient changes. That’s why the pre-wetting method is more reliable than just hoping your humidity stays constant. I control the moisture cycle myself rather than leaving it to weather patterns.
How to Sand Out Raised Grain After It Happens
You’re here because you didn’t prevent it. That’s fine. I’ve been there.
First step — stop. Don’t apply more finish. Don’t panic-sand aggressively. The fix is methodical, and rushing creates worse problems like uneven surfaces or cross-grain scratches.
Use 120-grit paper, not anything coarser. Coarser paper removes too much material too quickly, and you’ll create low spots that catch light differently from the raised grain area. You want just enough abrading action to level those standing fibers without excavating the surrounding surface. A random orbital sander set to moderate pressure works. Hand sanding is slower but gives you better feedback about what’s happening under the paper.
Sand with the grain direction, not against it. This is non-negotiable. Cross-grain or diagonal sanding during your recovery pass will scratch the surface worse than the raised grain itself. If your wood has a wavy or irregular grain pattern, you might need to make passes at slightly different angles, but always try to favor the dominant grain direction.
Check your progress frequently. Run your hand across the surface every 30-60 seconds. You’ll feel when the fuzzy texture disappears and the surface turns smooth again. This usually takes 2-5 minutes of sanding on a small section like a drawer front. A tabletop might take 20 minutes. Don’t keep sanding past smooth — you’re not trying to mirror-polish, just level the raised fibers.
Vacuum thoroughly before applying finish again. Use a shop vac with a fine-filter attachment, not just a brush and dustpan. Raised grain re-sanding produces a lot of fine dust that settles into grain pores, and that dust under finish looks like specs. I learned this the hard way on a cherry nightstand — had to sand the whole piece again because I didn’t vacuum properly.
Let the wood rest for 24-48 hours before finishing if you’ve just sanded it. This lets any dust particles settle and any moisture from shop humidity equilibrate. Probably should have opened with this section, honestly, because it saves you from re-raising grain right after you fixed it.
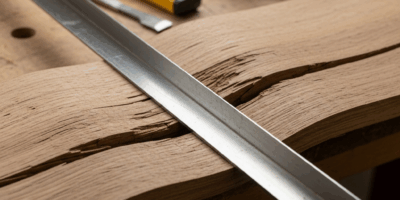
When to Use a Scraper Instead of Sanding
There’s a faster way if the raised grain is minimal and you’re dealing with a smaller surface.
A cabinet scraper — the rectangular tool with a bent edge, not a paint scraper — removes raised grain fibers without abrading the entire surface. I use a Bahco or Lie-Nielsen (#80) for this, about $20-40, and it works on anything from pine to walnut. The technique is simple: hold the scraper at roughly 45 degrees and pull it toward you with moderate pressure. The bent cutting edge shaves off just the raised fibers while leaving the flat surrounding surface untouched.
This method is faster for small areas and preserves wood dimension better than re-sanding. You’re not removing layers — you’re removing millimeters of fiber height. On a 12×16 inch panel, a scraper can flatten raised grain in 3-5 minutes. Sanding that same area with 120 grit takes 15-20. Hand planes work too if you have one tuned sharp, but a scraper is more forgiving for this specific task.
The downside: it only works if the raised grain is truly minor. If you’re dealing with heavily raised grain across a large surface — like an entire tabletop that spent humid weather between rough sanding and finish-work — you’ll need to sand. A scraper becomes a tiring and imprecise method at that scale.
I keep a scraper tuned and ready specifically for this problem. Having it nearby means I fix raised grain immediately instead of letting it sit and becoming more aggravating.
Common Mistakes That Make Raised Grain Worse
Skipping intermediate grits is the number one culprit. I see this constantly — someone sands through 100 grit, gets impatient, jumps to 220, applies stain, and suddenly the whole project looks like it came out of a dumpster. The mid-range grits (120-180) are doing essential leveling work that 100 alone can’t accomplish. They’re not luxury steps. They’re structural to the process.
Aggressive re-sanding after raised grain appears is mistake number two. I’ve watched makers break out 80-grit paper, determined to “fix this properly,” and sand away 1/16 inch of wood in five minutes. Now the surface is too low, and the surrounding wood is too high. You’ve created an undulating mess. Light passes with 120-grit are the answer, not industrial-grade material removal.
Not vacuuming between grit changes will also ruin you. If 100-grit dust sits on your wood and you sand over it with 220-grit paper, you’re grinding that coarser dust into the surface, creating scratches that feel smooth under your hand but look awful under stain or clear coat. Vacuum between every grit. Actually vacuum. Don’t just brush.
Humidity swings during the sanding-to-finish window destroy preparation. If you sand in dry conditions, leave the wood sitting for three days in humid weather, then finish it, the grain will raise from that humidity exposure alone. Climate control isn’t realistic for most home shops, so the workaround is the pre-wetting technique — it eliminates the surprise moisture change because you’ve already cycled the wood through absorbed moisture intentionally.
Finishing too soon after sanding is underrated as a mistake. Dust needs to settle. Moisture from shop humidity needs to stabilize. Wood is dynamic. Give it 24 hours minimum between your final sanding pass and your first coat of anything that will cure on the surface. This single practice prevents more problems than any technique.
“`


Stay in the loop
Get the latest artisan furniture makers updates delivered to your inbox.