The Six-Board Tradition
Six-board furniture construction has gotten less clear-cut with all the modern interpretations and unnecessary modifications flying around. As someone who’s built everything from blanket chests to dining room sideboards using this time-tested method, I dug into the practical details of keeping things simple without sacrificing quality. Today, I will share it all with you.
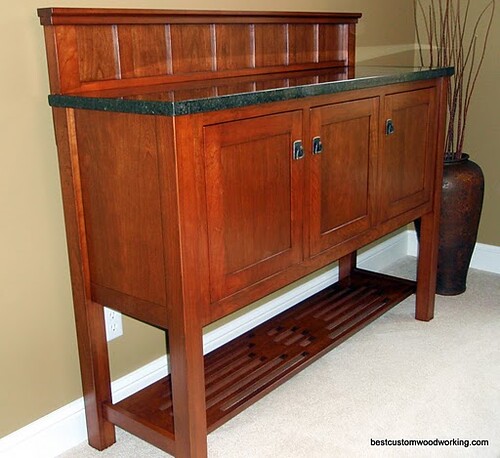
Long before power tools and complex joinery, craftsmen built furniture using the simplest possible construction: six boards joined together to create something functional and lasting. This method produced blanket chests, work benches, and yes, dining room sideboards that have survived centuries of daily use. I’ve seen six-board pieces in antique shops that are pushing 200 years old and still dead solid. The six-board sideboard remains relevant today precisely because its simplicity doesn’t compromise on either utility or beauty.
This project uses exactly six primary boards: two sides, a top, a bottom, a back, and a front face frame. From these humble components emerges a sideboard measuring 48 inches long, 18 inches deep, and 34 inches tall — perfect dining room proportions that work equally well in a farmhouse kitchen or a modern apartment.
Board Selection and Preparation
That’s what makes board selection endearing to us traditional woodworkers — with only six pieces to work with, every single one matters. Success with six-board construction demands quality lumber because there’s nowhere to hide mistakes. Choose boards that are flat, straight, and free of major defects. For this sideboard, I recommend 3/4-inch pine in #1 common grade. It’s affordable, readily available, and takes paint or stain beautifully. You can absolutely use hardwood if you want, but pine is traditional and keeps the budget honest.
You’ll need two side panels at 18 inches wide by 34 inches tall. Achieving 18-inch width typically requires edge-gluing two narrower boards. Take your time with this glue-up: joint the mating edges perfectly straight, use sufficient clamps to close any gaps, and allow a full 24 hours of cure time before milling the panels to final dimension. I’ve seen people rush this step and end up with a visible glue line right down the side of the finished piece. Not worth saving a day.
The Critical Joinery
Probably should have led with this issue, to be candid. Traditional six-board construction relies on dados and rabbets — arguably the most forgiving joints in all of woodworking. Cut a 3/4-inch wide dado, 3/8-inch deep, across each side panel to accept the bottom board. Position this dado 4 inches up from the bottom edge, creating a toe kick space beneath that makes the sideboard feel like built-in furniture rather than a box sitting on the floor.
At the back edge of each side, cut a 3/8-inch deep rabbet to receive the back panel. This rabbet should run the full height of the side. For the top attachment, cut a shallow rabbet along the top inside edge of each side — the top board rests in this ledge and gets secured with screws from above.
The beauty of this approach is its tolerance for imperfection, and I don’t say that to encourage sloppy work. Dados don’t require the precision of dovetails or mortise and tenon joints. A slight gap disappears once the piece is assembled and finished. I’ve taught this build to complete beginners, and their first pieces came out looking like they’d been doing this for years.
Assembly Sequence
Dry-fit everything first. Always. The bottom should slide into its dados with moderate hand pressure. The back panel drops into its rabbets. The top rests on its ledges. If everything fits without forcing, disassemble and begin the actual glue-up.
Apply glue to the dados and slide the bottom into place between the two sides. Clamp across the case to draw the joints tight. Before the glue sets, check for square using diagonal measurements and adjust clamp pressure as needed. Then install the back panel with glue and brad nails while the case is still clamped — it helps lock everything square and adds significant rigidity. I’ve had pieces that felt wobbly before the back went on turn absolutely rock-solid once it was nailed in place.
Adding the Face Frame
The sixth board is actually a face frame assembly that covers the front edges and creates the door opening. Build this frame from 2-inch wide stiles and rails joined with pocket screws. The frame overlaps the case by 1/4-inch on each side, creating a reveal that adds visual interest and forgives any slight imperfections in the case edges.
Attach the face frame with glue and brad nails. Fill nail holes with wood filler matched to your finish choice. If you’re painting, use standard wood filler. For staining, use a filler that accepts stain or fill after staining with a color-matched putty. I’ve tried both approaches and honestly prefer filling after stain — it’s easier to match the color when you can see the actual stained surface.
Doors and Interior
Simple frame-and-panel doors suit this design perfectly. Build door frames from 2-inch stock with a 1/4-inch plywood panel captured in a routed groove. Mount doors using European cup hinges for easy adjustment, or traditional butt hinges for a more authentic appearance. If you’re going for the colonial farmhouse look, butt hinges with a dark oil-rubbed finish are the way to go.
Inside, install one fixed shelf at mid-height. This provides ample storage for table linens, serving pieces, or overflow pantry items — exactly what a sideboard should accommodate. Keep the interior simple; it’s doing its job by creating two distinct storage zones.
Finishing Touches
Sand through 220-grit, breaking all sharp edges with a light pass. Prime all surfaces if painting, paying special attention to end grain which absorbs finish unevenly and will show through if you skimp on the primer. Two coats of semi-gloss latex provide durability appropriate for dining room use. If you’re staining instead, a pre-stain conditioner on pine prevents the blotchiness that gives pine a bad reputation.
Add simple wooden knobs and your sideboard is complete. This project typically requires 8-10 hours of shop time and under $200 in materials — remarkable economy for a piece that will serve your family for generations. I’ve built four of these as gifts, and every recipient still uses theirs daily. That’s the kind of furniture that matters.


Stay in the loop
Get the latest artisan furniture makers updates delivered to your inbox.