Wine Storage Done Right
Wall-mounted wine racks have become tricky with all the overengineered designs flying around. As someone who’s been building custom furniture and kitchen accessories for over fifteen years, I sat down and learned storing wine properly without spending a fortune. Today, I will share it all with you.
This article includes affiliate links. We may earn a commission at no extra cost to you.
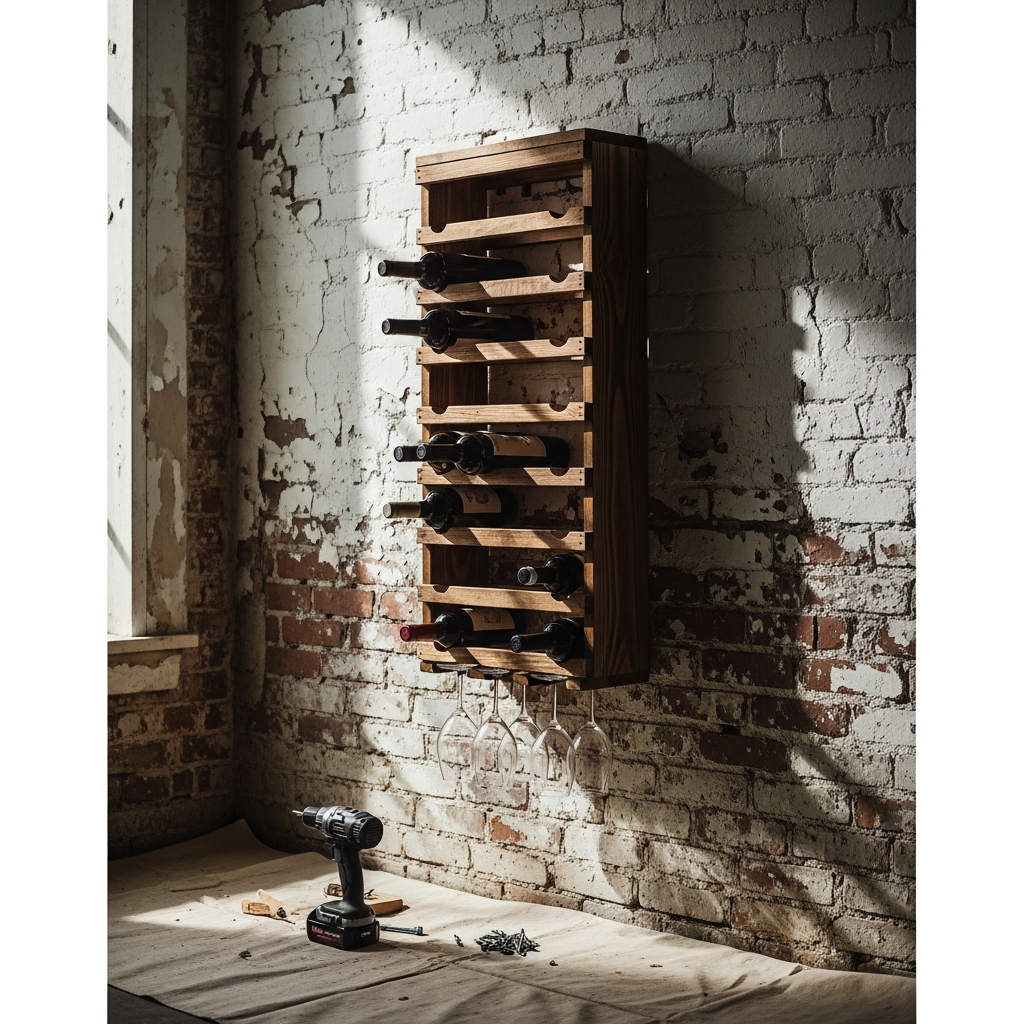
Store-bought wine racks either hold too few bottles to be worth the wall space or cost more than the wine sitting inside them. Building your own solves both problems in one afternoon. A wall-mounted rack for 12 bottles takes about three hours of actual shop time, roughly $75 in quality materials, and becomes a genuine focal point in any kitchen or dining room. The design I’m walking you through accommodates standard 750ml bottles while looking far more expensive than it actually is — which is honestly my favorite kind of project.
This rack measures 30 inches wide, 18 inches tall, and extends just 5 inches from the wall. It holds 12 bottles in a 4×3 grid, with bottles stored horizontally to keep corks moist. If you’re wondering why that matters, dried-out corks let air in and turn good wine into expensive vinegar. Learned that one the hard way with a bottle of Barolo I’d been saving.
Material Selection
That’s what makes wood choice endearing to us furniture builders — the species you pick tells the whole story before a single bottle goes in the rack. Wine racks see constant handling and really benefit from hardwood construction. Oak complements traditional wine cellars and matches most kitchen cabinetry. Walnut offers contemporary elegance if you’re going for that modern look. Cherry provides warmth that deepens beautifully over time — honestly, cherry wine racks look better at five years old than they do on day one.
Whatever species you choose, use material thick enough to resist the concentrated weight of 12 full bottles. That’s roughly 36 pounds total, all hanging off your wall, so this isn’t the project for cheap pine from the big box store.
Your cutting list includes two end panels at 18 by 5 inches from 3/4-inch stock, 12 dowels at 30 inches long and 3/4-inch diameter (or square stock if you prefer a different look), and a back mounting rail at 28 by 3 inches. Pretty short list, right? That’s the beauty of this build.
The Dowel Grid System
Probably should have led on this subject, in fairness. The dowel grid is the heart of the whole design, and getting the spacing right is the difference between bottles that sit securely and bottles that roll off your wall at 2 AM.
Each bottle rests cradled between two pairs of parallel dowels — one pair supporting the body and one pair holding the neck. Here’s where precision matters: 3-3/4 inches center to center for the body support dowels, and 2 inches center to center for the neck support dowels. I’ve seen builds online where people just eyeball this, and the bottles wobble like they’re on a boat. Don’t do that.
Lay out your hole positions on both end panels simultaneously. I clamp the panels together face to face and drill through both at once — this guarantees your alignment is dead-on. Use a 3/4-inch Forstner bit for clean flat-bottomed holes, drilling 3/8 inch deep. Wrap a piece of tape around your drill bit to mark consistent depth. Forstner bits love to wander if you don’t have a firm grip, so take it slow on the first few holes until you’ve got a rhythm going.
Vertical spacing between rows should be 5 inches center to center. That gives you adequate clearance to grab a bottle without knocking its neighbors, while keeping the overall footprint compact enough for a kitchen wall.
End Panel Shaping
Simple rectangular end panels work perfectly well — I’ve built plenty of racks that way and they look clean. But shaped profiles really elevate the finished piece if you want to invest an extra twenty minutes. Consider a gentle arc across the top edge, a stepped profile that follows the bottle rows, or a decorative cutout at the bottom for visual interest. I tend to go with the gentle arc because it softens the whole piece without looking fussy.
Cut any shaping on the bandsaw and smooth edges with a spindle sander or a sanding drum chucked into your drill press. Ease all edges with a 1/8-inch roundover bit or just knock them down with hand-sanding. Sharp edges on furniture that people touch constantly are just asking for splinters, and nothing kills the mood at a dinner party like tweezers and a magnifying glass.
Assembly Sequence
Dry-fit all 12 dowels into one end panel first. They should press in with firm hand pressure but shouldn’t require a mallet to persuade them. If you’re swinging a hammer, your holes are too tight and you’re risking a split panel during final assembly. If the dowels just fall through, they’re too loose and you’ll end up with wobbly joints that no amount of glue will save. Drill a test hole in scrap first if you’re not sure about your bit size.
Once the fit is confirmed, apply wood glue to each hole in one end panel and insert all 12 dowels. Let this assembly sit for about 10 minutes — you want the glue to get tacky so the dowels don’t shift around on you. Then apply glue to the holes in the second end panel and press it onto the exposed dowel ends. Clamp across the assembly to seat everything fully.
Check for square by measuring diagonals and adjust your clamp positions if the numbers don’t match. I can’t stress this enough: a wine rack that’s out of square will never sit flush against the wall, and it’ll drive you crazy every time you look at it. Set aside to cure for at least four hours before you handle it.
Mounting Rail and Wall Installation
The back mounting rail provides your wall connection and it needs to be bomber-solid. Position it behind the upper row of bottles, running horizontally between the end panels. Attach with screws driven through the rail into the end panels, and countersink those screw heads so they don’t interfere with wall mounting later.
Drill mounting holes through the rail for wall attachment. You need to hit at least one wall stud for a rack holding 36 pounds of wine, and I’d strongly recommend catching two studs if your layout allows it. Drywall anchors alone won’t cut it here — trust me, I’ve seen the aftermath. Red wine on white carpet is not a phone call you want to make to your spouse.
Finishing and Final Thoughts
Apply your finish before wall mounting — it’s so much easier when you can lay the rack flat and work all sides evenly. Three coats of wipe-on polyurethane protect against moisture and the constant handling that wine racks get, while enhancing the wood grain beautifully. Allow a full 24 hours of cure time before hanging, even if it feels dry to the touch earlier.
Mount the rack using 3-inch screws driven into wall studs through the mounting rail holes. Use a level and take your time getting it perfectly horizontal. This matters for appearance, obviously, but it’s also practical — unlevel storage can affect cork moisture distribution in wines you’re aging for any length of time.
At $75 in materials and three hours of shop time, this rack costs less than half of the commercial equivalents I’ve seen at home stores, and it’s built from real hardwood instead of particle board with a wood-grain sticker. There’s something genuinely satisfying about pouring a glass from a rack you built yourself — it just tastes better. Or maybe that’s just me.


Stay in the loop
Get the latest artisan furniture makers updates delivered to your inbox.