“`html
Why Tabletops Fail Year One
I built my first real dining table in 2016. Quarter-sawn white oak, beautiful grain, perfectly flat when it left my shop in April. By December, the top had gaps half an inch wide running perpendicular to the grain. The breadboard ends—which I’d attached with simple pocket holes—had stayed put while the main field expanded and contracted with seasonal humidity changes. That table is now a cautionary tale I reference every time someone asks me about wood movement in tabletop design.
Here’s what most makers miss: they know wood moves. They just don’t know how to design around it before it becomes a crisis.
Wood shrinks and swells primarily in two directions — along the growth rings (tangential movement) and from the center outward (radial movement). Tangential movement is roughly twice as much as radial. On a tabletop 30 inches wide running with the grain direction east to west, you’re looking at seasonal movement of maybe 3/8 inch in width. Not catastrophic, sure, but enough to split your breadboard ends if they’re screwed down solid. The grain direction you choose, the species you pick, and the climate your table will live in all determine whether you’re gambling or designing.
The problem gets worse with wider tables and species that move aggressively. I’ve seen red oak tops shift 5/8 inch across their width in a single heating season in Wisconsin. Walnut moves less — maybe 3/8 inch for the same dimensions — but still enough to ruin a joint that doesn’t account for it.
The solution isn’t magic. It’s joinery that sees movement coming and welcomes it instead of fighting it.
Breadboard Ends Done Right
Breadboard ends are the classical answer to wood movement on tabletops. A breadboard end is a separate piece of wood running perpendicular to the table’s main field, mortised onto a tenon at the table’s edge. Done correctly, it locks the short grain direction while allowing the main field to move freely underneath.
Here’s how I lay them out now.
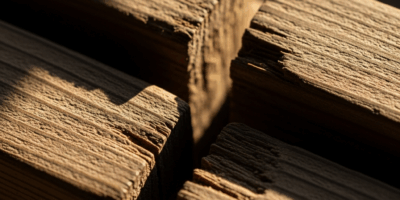
First, measure your table’s width at the point where the breadboard will sit. Let’s say it’s 36 inches. The central tenon on each end of the tabletop should be roughly 5 to 6 inches long and centered on the end grain. This tenon slides into a mortise in the breadboard end, and that’s where the control happens.
The mortise gets drilled or routed at dead center of the breadboard. The tenon gets cut slightly loose — I aim for 1/16 inch clearance on each side. That’s not casual; measure it with calipers. The mortise should be deeper than the tenon is long (I go 1/2 inch deeper), so the joint doesn’t bottom out and jam.
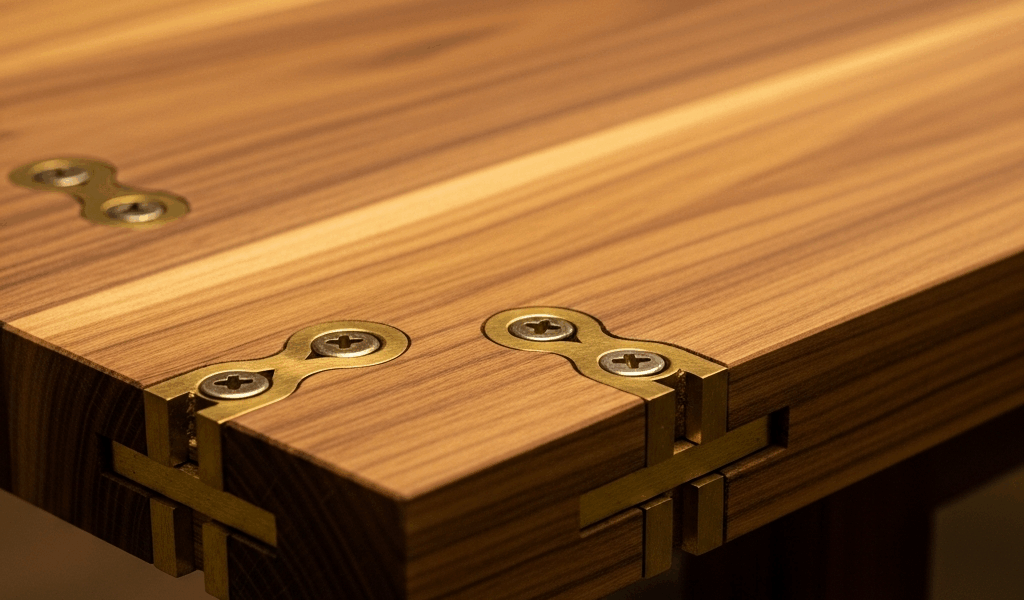
Now the critical part: the screw holes in the breadboard end. You cut those as slots, not round holes. A slot running perpendicular to the wood grain direction lets the breadboard shrink and swell without binding the main field. The central tenon screw goes in a regular hole at dead center. The outer screws — typically two per end — go in slots that run grain-parallel.
Should you be this precise? Absolutely. I learned the hard way that “close enough” tolerances create loose joints that rattle or crack. A loose mortise-and-tenon on a dining table moves unpredictably and wears fast. I’ve had to rebuild breadboards on existing tables because the original maker skipped the layout work.
The slot width matters too. I make them 1/4 inch wide minimum, giving plenty of play for seasonal movement. The length depends on your table width and species. For a 36-inch white oak table, each outer slot gets roughly 3/16 inch of travel — enough to handle expansion without bottoming out the screw.
Figure-8 Fasteners and Slot Screws
Not every tabletop gets breadboard ends. Production work, smaller tables, and quick commissions often call for figure-8 fasteners or slot screws instead.
Figure-8 fasteners work like this: a metal plate shaped vaguely like a figure-8 sits in a mortise routed into the underside of the table apron. The top screw hole (the smaller loop of the 8) goes through the apron. The bottom hole (the larger loop) engages with a screw in the tabletop. As the tabletop wood moves, the fastener rotates slightly, allowing seasonal expansion and contraction without transmitting force back to the apron.
Old-school buttons are simpler — a wooden peg with a screw hole, glued into the apron, then screwed up through the top. The screw hole in the peg is slightly oversized, allowing the fastener to slide as the wood moves. They’re elegant and invisible from above. They’re also less reliable than figure-8s if you need production-level repeatability.
Figure-8 fasteners dominate commercial furniture for good reason. They’re consistent, they allow predictable movement, and they’re bombproof if installed right. I use them on any table under 28 inches wide or when the tabletop runs solid without breadboard ends.
Slot screws work the same way mechanically. You rout a slot perpendicular to the grain direction in both the apron and the tabletop, then drive a screw through that slot into a pilot hole. The slot lets movement happen while the screw stays engaged. This is faster than figure-8s on a one-off basis, but you’re building the movement allowance into every screw hole, which means more layout work upfront.
The choice between these three methods comes down to table size, visible hardware tolerance, and the time budget for layout. Figure-8s hide completely. Slot screws show if the table gets flipped. Breadboard ends are visible design elements — worth doing right because they’ll be seen.
Grain Orientation and Thickness Rules
Probably should have opened with this section, honestly. You can engineer all the joinery in the world, but grain orientation and thickness stop wood movement before it starts.
A flat-sawn 8/4 tabletop moves roughly twice as much as a 4/4 top of the same species and dimensions. Thinner wood reaches equilibrium with the environment faster, and the total amount of movement is smaller. If you’re specifying a top, go 1.5 inches thick (dressed to 1.25 inches) or thinner when possible. You sacrifice some visual mass, but you shrink the movement problem proportionally.
Quarter-sawn wood moves roughly half as much tangentially as flat-sawn wood from the same log. That’s why I use quarter-sawn oak and maple on tables destined for high-movement climates. Walnut and cherry are more stable flat-sawn anyway, so the milling cost doesn’t justify quarter-sawing unless you’re chasing grain figure.
Here’s a quick reference for width movement on a 36-inch-wide tabletop in a typical heating season (30% to 50% relative humidity swing):
- Red oak (flat-sawn): 3/16 inch to 5/16 inch
- White oak (quarter-sawn): 1/8 inch to 3/16 inch
- Hard maple (flat-sawn): 1/8 inch to 5/32 inch
- Walnut (flat-sawn): 1/8 inch to 3/16 inch
- Cherry (flat-sawn): 1/16 inch to 1/8 inch
These aren’t absolutes — they depend on the specific moisture conditions where the table lives. A table in Arizona moves less than one in Minnesota, even if they’re made from identical boards. But they give you a real baseline for design decisions.
How to Choose Your Strategy
Start with table size and climate. A 48-inch walnut dining table destined for the Midwest needs breadboard ends. That width and that climate demand it. Movement will be 3/8 inch or more in winter heating season. A breadboard end designed with proper tenon/mortise work and slotted screws handles that predictably.
A 24-inch cherry console table in the same climate? Figure-8 fasteners, quarter-sawn wood, or even simple slot screws will manage the movement (probably 1/8 inch total). The width is small enough that you don’t need the visual anchor of a breadboard end.
A 60-inch white oak library table in a climate-controlled office? Thicker top, quarter-sawn if available, and figure-8s every 12 inches around the perimeter. The stable climate reduces movement pressure, but the width demands redundancy in your fastening strategy.
Ask yourself four questions before cutting joinery:
- How wide is the tabletop running with the grain?
- What species are you using, and how does it move?
- Where will the table live — humid climates, dry climates, or climate-controlled?
- How much visible hardware can the design accommodate?
The first three drive the technical requirement. The fourth drives the execution. A historical reproduction table demands breadboard ends because that’s what’s historically correct, even if a modern fastening method would work as well. A contemporary table can use figure-8s hidden under the apron.
Wood movement stops being a crisis when you design it in from the start. It’s the difference between a table that needs repair in five years and one that stays flat for a generation.
“`

Stay in the loop
Get the latest artisan furniture makers updates delivered to your inbox.