
The Joints That Make Furniture Actually Strong
I spent my first year of woodworking avoiding dados and rabbets. They seemed like extra work when pocket screws and wood glue held things together fine.
Then I built a bookcase with pocket screws. Loaded it with books. Watched the shelves slowly sag over six months until they were bowing visibly. That bookcase still haunts me.
Dados and rabbets exist because they distribute weight across the joint instead of relying on tiny screws or glue alone. Once I started using them, the quality of my furniture changed dramatically.
What Is a Dado Exactly
A dado is just a groove cut into wood. It runs across the grain, usually. You slide another piece of wood into that groove, and suddenly you have a joint with a lot of surface area for glue and mechanical support.
The shelf that sagged? Pocket screws held it to the side panel at two small points. A dado spreads that load across the entire width of the shelf where it meets the side. Much stronger.
Through dados go all the way across the board. You can see them on the front edge. Stopped dados stop before they reach the front, so the joint is hidden. Stopped look cleaner but take more work.
Rabbets Are Slightly Different
A rabbet is an L-shaped cut along the edge or end of a board. Think of it as half of a dado. You use rabbets to recess backs into cabinets, to join the corners of boxes, to set glass into frame rails.
Every cabinet back I install sits in a rabbet now. It is cleaner than just nailing the back on top of the frame, and it makes the cabinet more rigid overall. The rabbet gives the back panel a mechanical seat instead of just relying on fasteners.
How I Cut Them
For dados, I use a stacked dado set on the table saw most of the time. You can dial in the width by adding or removing chippers from the stack. Takes a few test cuts to get it right, but once dialed in, you can cut a bunch of identical dados pretty fast.
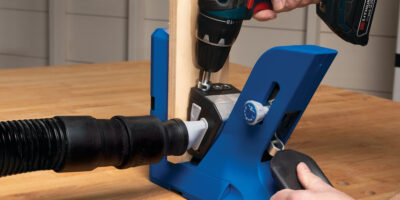
Router with a straight bit works too. Better for stopped dados since you can control exactly where the cut starts and ends. I usually clamp a straight edge to guide the router.
Rabbets are easier. You can cut them with a regular blade on the table saw, taking two passes. One cuts the depth, one cuts the width. Or use a rabbeting bit on the router for curved work and edges where the table saw cannot reach.
Getting the Fit Right
This is where dados get tricky. Plywood is never actually three quarters of an inch thick. It is usually 23/32 or somewhere around there. Cut a three quarter inch dado for three quarter inch plywood and you get a loose, sloppy fit.
I have a dado set that includes thin shims, and I use those to dial in the exact width. Test fit on scrap first. Every time. You want the shelf to slide in with a little friction but not require hammering.
Solid wood is a little more forgiving because you can actually plane it to fit the dado if needed. Still, testing on scrap saves a lot of grief.
Where I Use Them
Bookcases: Every fixed shelf sits in a dado. Adjustable shelves rest on pins, but the top and bottom fixed shelves get dados. Makes the whole unit more rigid.
Drawer boxes: The bottom panel sits in a groove (which is basically a dado cut along the grain) in all four sides. Keeps the bottom from falling out under load.
Cabinet construction: Dados for the fixed internal dividers, rabbets for the back panel. This is standard stuff but it took me too long to actually start doing it.
Frame and panel doors: The panel floats in a groove cut into the frame pieces. Not technically a dado since it runs with the grain, but same concept.
Common Mistakes I Made
Cutting the dado too deep. You want about half the thickness of the board, maybe a little less. Go too deep and you weaken the piece you are cutting into. Go too shallow and the joint has less surface area.
Not accounting for the saw blade thickness when positioning cuts. Measure from the actual cut line, not from the blade edge. I ruined several bookcase sides before this sank in.
Trying to cut a dado in one pass when it is wider than my blade can handle. Take multiple passes, slightly overlapping, and clean up the bottom with a chisel if needed.
Clean Up and Finishing
A sharp chisel and a shoulder plane are your friends here. Any fuzz or roughness in the dado gets in the way of a good fit. Take a minute to clean up the joint before assembly.
For stopped dados, you need to square up the rounded end left by the router bit. Chisel work, mostly. Or you can round over the corner of the shelf to match the radius. Either works.
Learning to cut clean dados and rabbets was one of those skills that quietly leveled up all my furniture building. Not flashy, not something clients notice directly. But the difference shows up in how long the pieces last and how solid they feel.


Stay in the loop
Get the latest wildlife research and conservation news delivered to your inbox.