When Built-In Closets Aren’t an Option
Freestanding wardrobes have gotten complicated with all the flat-pack furniture and modular closet systems flying around. As someone who’s built custom storage solutions for renters, historic homeowners, and anyone else who can’t (or won’t) tear into their walls, I learned everything there is to know about building wardrobes that stand on their own — literally and figuratively. Today, I will share it all with you.
Renters, historic home owners, and anyone dealing with plaster walls they’d rather not damage — these are the people who need freestanding wardrobes, and they’re the clients I build for most often. Building your own solves problems that store-bought alternatives simply can’t: custom dimensions for awkward spaces, quality construction that outlasts flat-pack furniture by decades, and the satisfaction of owning something built specifically for your needs rather than manufactured for the lowest common denominator.
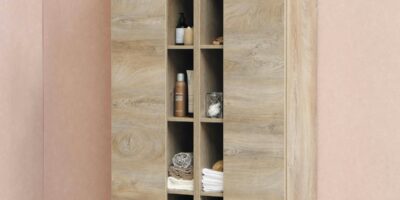
This wardrobe design measures 60 inches wide, 24 inches deep, and 78 inches tall. It incorporates a full-width hanging section, drawer storage below, and adjustable shelving on one side. Total material cost runs $350-450 in hardwood plywood with solid wood accents.
Engineering for Stability
That’s what makes wardrobe construction endearing to us cabinetmakers — the engineering challenge is genuinely different from building something that bolts to a wall. Freestanding wardrobes face unique forces. Without walls for support, the piece must resist racking from daily use — opening doors, sliding drawers, and the weight of hung clothing creates stress that wall-mounted closets transfer to the building structure. Your joinery has to handle all of this independently.
I build the carcass from 3/4-inch hardwood plywood, using dado joints for all fixed horizontal components. The top and bottom panels fit into 3/8-inch deep dados cut into the side panels. A vertical center divider, also joined with dados, provides additional rigidity and separates the hanging section from shelving.
Here’s the component that makes or breaks the whole piece: a 1/4-inch plywood back panel glued and nailed into rabbets cut around the entire rear perimeter. This back panel functions as a stressed skin, preventing the wardrobe from racking sideways. Never skip this component, and never use a loose-fit back panel that doesn’t actually provide structural support. I’ve seen wardrobes built without a proper back panel, and they wobble like a card house within a year.
Base Construction
Probably should have led with this section, honestly. The base is what keeps this massive piece stable on the floor, and building it as a separate component makes everything easier. Use 2×4 lumber for the frame, creating a rectangle 2 inches shorter and narrower than the cabinet footprint. This creates a toe kick setback that makes the wardrobe feel more built-in, even though it isn’t attached to anything.
Join base frame corners with pocket screws and add center support rails for spans over 36 inches. Cover the visible base faces with 1/4-inch plywood or hardwood strips to match the cabinet exterior. The cabinet simply rests on this base and can be secured with screws driven up through the base frame into the cabinet bottom. Keeping the base separate means you can level it independently, which matters a lot when you’re dealing with old houses where no floor is actually flat.
Hanging Rod and Support
Position the hanging rod 66 inches from floor level — standard closet height that accommodates most garments while leaving space below for drawers or additional storage. Use a 1-1/4 inch diameter wooden rod or chrome tube, supported by end brackets rated for the expected load. I prefer wooden rods for the aesthetic match, but chrome tubes are stronger for heavy coat collections.
For wardrobes over 48 inches wide, add a center support bracket to prevent rod sagging under the weight of heavy coats or a packed-full closet. This support can be a simple vertical wooden cleat attached to the back panel. It takes five minutes to install and saves you from the slow, ugly sag that happens over time without it.
Drawer Construction
Build drawers using 1/2-inch Baltic birch plywood for the box and 1/4-inch plywood for the bottom panel, captured in a groove rather than nailed underneath. This construction handles heavy loads — think stacked sweaters and jeans — and survives decades of daily use without complaint.
Install drawers on full-extension ball-bearing slides rated for at least 100 pounds per pair. Side-mount slides work well here; they’re easier to install than undermount systems and provide excellent stability. Allow 1/2-inch clearance on each side of the drawer for slide thickness. I’ve had to rebuild drawers that were cut too wide for their slides, and it’s not a mistake you make twice.
Door Design and Installation
Full-overlay doors provide maximum access to the interior and look the cleanest. Build doors from the same hardwood plywood as the case, adding a solid wood edge band to hide the plywood layers and give the door a more substantial feel. A 1/8-inch edge band applied with glue and brad nails, then flush-trimmed, creates a clean appearance that reads as solid wood.
Use European concealed hinges with 110-degree opening for full access. Install three hinges per door on wardrobes this tall — two hinges will eventually sag under the door weight, and dealing with a sagging wardrobe door six months later is not how I want to spend a Saturday. Adjust hinges carefully after installation for even gaps and smooth operation. The three-way adjustability of European hinges is a genuine lifesaver here.
Adjustable Shelving System
Drill shelf pin holes in the non-hanging section using 32mm spacing — the European system standard that gives you maximum flexibility for repositioning shelves later. A drilling jig ensures consistent spacing and alignment between the two side panels. Use 5mm shelf pins and cut shelves 1/4-inch narrower than the opening for easy insertion and removal.
Finishing and Installation
Finish all components before final assembly. Prefinishing ensures complete coverage of interior surfaces that become totally inaccessible after the piece goes together. Apply three coats of your chosen finish — polyurethane for durability, lacquer for speed, or paint if you’re matching existing bedroom decor. I’ve done all three, and each has its place.
Position the completed wardrobe and secure it to the wall with a single safety bracket at the top rear — even freestanding furniture benefits from anti-tip restraint, especially if there are children in the house. This wardrobe provides genuine closet-quality storage without any permanent modification to your space, which is exactly what your landlord or your historic home’s plaster walls wanted to hear.