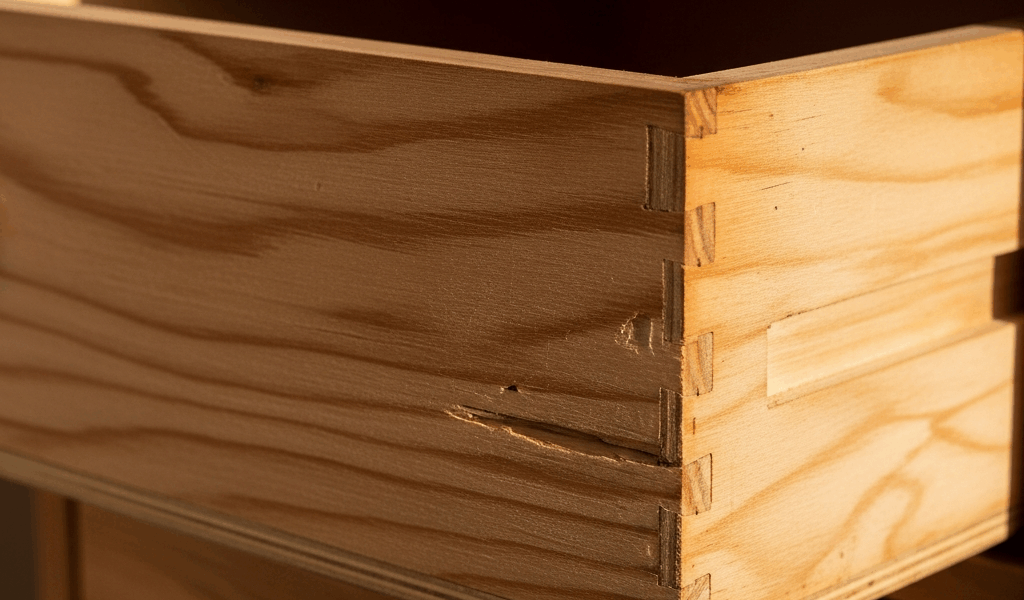
Why Drawer Bottoms Warp in the First Place
Drawer bottom repairs have gotten complicated with all the conflicting advice flying around. I’ve rebuilt enough drawers to know that most failures follow one of two paths: cross-grain wood movement or moisture absorption. The fix depends entirely on which one you’re dealing with — and getting that wrong means doing the job twice.
Solid wood drawer bottoms are the culprit most often. They expand and contract across the grain with humidity changes, sometimes by 1/8 inch or more across an 18-inch span. That movement has to go somewhere. Glue or nail the bottom into grooves that don’t allow float, and the wood buckles instead of moving freely. Grain direction matters enormously here. Run it side-to-side across the drawer and you’re amplifying the problem, because the longer dimension is where wood moves most.
Plywood bottoms fail differently. More stable across grain — which is why production furniture relies on them — but plywood warps from moisture imbalance. One face absorbs humidity faster than the other. This happens during storage in damp shops, after shipping through humid regions, or sitting in a warehouse before finishing. Cheap veneer-core plywood warps worse than Baltic birch or cabinet-grade material. A 1/4-inch plywood bottom on a 24-inch-wide drawer is asking for trouble. That span is simply too long for the material to stay flat under weight.
But what is the real distinction here? In essence, it’s the difference between movement and moisture. But it’s much more than that — a fix that works for solid wood does nothing for plywood, and vice versa. Know which you’re looking at before you touch anything.
How to Tell What Went Wrong Before You Fix Anything
Probably should have opened with this section, honestly. Diagnosing the problem takes fifteen minutes and saves hours of wasted repair effort.
Start with the material. Look at the edge of the drawer bottom. Solid wood shows growth rings. Plywood shows laminated layers. That’s your baseline.
Next, answer these questions in order:
- Is it glued down or floating? Look at the groove where the bottom sits. Glued along all four edges means you’re dealing with a past mistake — more on that in a moment. Gaps visible on at least two opposite sides means it was meant to float.
- When did the warp appear? During your build, after finishing, or months later at the customer’s home? Warp that shows up immediately suggests a glue problem or pre-existing damaged material. Warp that develops over weeks points to moisture.
- What season or climate? Winter builds in dry shops rarely warp. Summer builds in humid regions warp constantly. Built in Arizona and shipped to Florida in July? Moisture is your answer, full stop.
- Is the warp consistent or does it change? Press the bottom flat by hand. Does it flex back? That’s live movement — moisture sensitivity. Does it stay put? Permanent deformation means the wood has set into its warped shape.
Once you’ve answered those, the cause becomes obvious. Glued solid wood bottom that warped during finishing? Cross-grain movement in a panel that couldn’t float. Plywood that arrived wavy and stayed that way? Moisture imbalance during storage. Solid wood that flexes in and out seasonally? Normal movement being strangled by a groove that’s too tight or glue in the wrong place.
Fixing a Warped Solid Wood Drawer Bottom
Solid wood bottoms can be salvaged — at least if you catch them early enough. The question is whether you can flatten the wood and whether the groove allows it to move freely once flat.
Mild warp, less than 1/16 inch across the span, responds to weight. Stack the drawer bottoms flat on a bench, lay a heavy board on top, and leave them for a week or two. I use bar clamps and heavy steel plates — the kind used for welding setups. The wood won’t stay permanently flat if moisture caused the warp, but you’re buying enough time to install it correctly.
The real fix is re-cutting the groove to allow float. Groove currently tight on all four sides? It has to be reopened. Cut it slightly wider on the sides running perpendicular to the grain — a 1/8-inch gap on each side handles typical cabinet widths. Front and back grooves stay snug. Expansion along the length is minimal, so those don’t need adjustment.
I’m apparently someone who learns expensive lessons, and gluing the bottom down “just to be safe” is one I won’t repeat. Don’t make my mistake. The wood expands against the glue and splits the drawer sides or cracks itself — usually six months later, when the customer calls. I’ve rebuilt three drawers because of exactly that miscalculation.
Severe warp — 1/8 inch or more, or wood that’s permanently set into a curve — replacement is cheaper than repair. A new solid wood bottom for a standard 18 by 20-inch drawer runs less than $15 in walnut or oak. Mills sell cut-to-size bottoms for $8 to $25 depending on species. Sand the groove clean, install the new bottom floating, and move on.
Fixing a Warped Plywood Drawer Bottom
Plywood is trickier because you rarely flatten it back. Veneer layers don’t respond to clamps the way solid wood does. So, without further ado, let’s dive into what actually works: replacement, done right.
Material choice matters first. Cabinet-grade birch plywood or Baltic birch — the 13-ply stuff used in high-end cabinetry — resists warping far better than cheap veneer-core. A 3/4-inch Baltic birch sheet runs $45 to $65 at most hardwood dealers, but you’ll cut four or five drawer bottoms from one sheet. That’s $10 to $15 per bottom. The quality difference versus luan is night and day.
Thickness for span is non-negotiable. Quarter-inch bottom works for drawers up to about 16 inches wide. Beyond that, use 1/2-inch material — or accept that the bottom will flex under weight and eventually warp. I’m apparently stubborn about learning this, because I built a set of bedside tables with 24-inch-wide drawers using 1/4-inch plywood bottoms. Dished within two months. Replacing them with 1/2-inch was the fix. That was an $85 lesson I didn’t need.
When installing the new bottom, seat it in the groove but don’t glue it. Let it float. Plywood doesn’t move as dramatically as solid wood, but it still breathes. A floating bottom prevents moisture from pooling on one face and recreating the imbalance that started the problem.
Finish both faces if possible. An unfinished bottom face absorbs moisture faster than a finished top face — that imbalance is what causes the warp. This is preventative rather than corrective, but it’s the difference between a drawer that lasts ten years and one that warps again by next summer.
Building Drawer Bottoms That Will Not Warp Again
Acclimating your material might be the best option, as drawer bottom longevity requires moisture equilibrium. That is because wood arriving from a different climate is still adjusting when you mill it. Let it sit in your shop for two weeks. Plywood needs this too. Store it flat — not standing on edge against a wall.
Grain orientation on solid wood matters. Run the grain side-to-side on the drawer, not front-to-back. This keeps expansion along the length of the drawer minimal, where movement causes binding.
Cut your groove 1/32 inch wider than the bottom thickness, 3/8 inch deep. Enough float without rattle. Test-fit before glue-up — every time.
Never glue the bottom. Period. Let it float.
Finish solid wood bottoms on both sides equally, or as close as you can manage. Same stain, same topcoat, same number of coats on the underside as the face. The moisture barrier needs to be balanced across both surfaces.
That’s what makes understanding wood movement so endearing to us woodworkers — it’s never just one thing. These steps take minutes and prevent months of callbacks. Worth doing right the first time.

Stay in the loop
Get the latest artisan furniture makers updates delivered to your inbox.