Why Chair Joints Squeak in the First Place
Chair squeaks have evolved with all the bad advice flying around. Half the internet tells you to spray WD-40 into the joint and call it done. That’s wrong — at least if you want the fix to last longer than three weeks.
As someone who’s been building and repairing chairs for nearly fifteen years, I got hands-on with what actually causes that noise. Today, I will share it all with you.
The mechanical reality is simple: two wood surfaces that should be locked together are moving instead. Friction between them generates sound. That’s it.
But squeaks fall into two distinct camps. Loose joints. Dried glue surfaces. Both involve micro-movement, but they demand completely different repairs — and confusing them is exactly how you end up doing the same job twice.
A loose joint happens when the tenon or dowel has lost its grip. The glue failed, or the surrounding wood compressed over years of use. You sit down, your weight creates lateral stress on the legs, the joint flexes slightly, and surfaces that should be bonded start rubbing. That friction is your squeak.
The second scenario is subtler. The joint is structurally sound — tenon and mortise are still tight — but the glue layer between them has dried, shrunk, and separated on a microscopic level. The wood isn’t married to its partner anymore. It’s just pressed against it. Same friction, different cause entirely.
Chair joints are especially vulnerable because they absorb dynamic lateral stress that table joints never experience. A dining table gets pushed across a floor — its joints stay mostly vertical. A chair gets sat in, rocked, leaned back, dragged across hardwood by one leg. Back legs flex forward and back. Side stretchers bend inward under load. Every single cycle grinds at the glue lines. That’s what makes chairs so endearing to us woodworkers — they’re genuinely one of the most mechanically demanding pieces of furniture a person can build.
Diagnosing Which Joint Is the Culprit
Here’s the part worth saying first. I’ve watched too many people inject glue into completely the wrong joint and then look genuinely baffled when the squeak returns the next morning.
Before touching any adhesive, you need to know exactly which joint is failing. So, without further ado, let’s dive in.
Sit in the chair. Rock it gently front to back and just listen. The squeak might be obvious, or it might hide underneath general frame creaking. Then apply lateral pressure to the seat — push the backrest sideways, push one leg outward, try to isolate specific movement.
Four zones fail most often:
- Back leg to seat rail — Usually the rear outside corner. This joint absorbs sideways stress every time you lean back.
- Front stretcher to front leg — Bears full weight every time you sit down. Stretchers fail here constantly.
- Side rungs — The middle stretchers connecting front and back legs on both sides. These bend inward under lateral pressure.
- Back splat connections — Where vertical spindles or splats join the crest rail or seat. High-stress points that get overlooked.
Use your hands directly. Place one palm on the suspected joint and apply that same sideways pressure. You’ll feel movement if the joint is actually loose. A high-pitched squeak usually means wood-on-wood rubbing — a tight joint creating friction. A deeper creak suggests more serious looseness, real structural wobble. Push harder. If the squeak gets louder, you’ve found it.
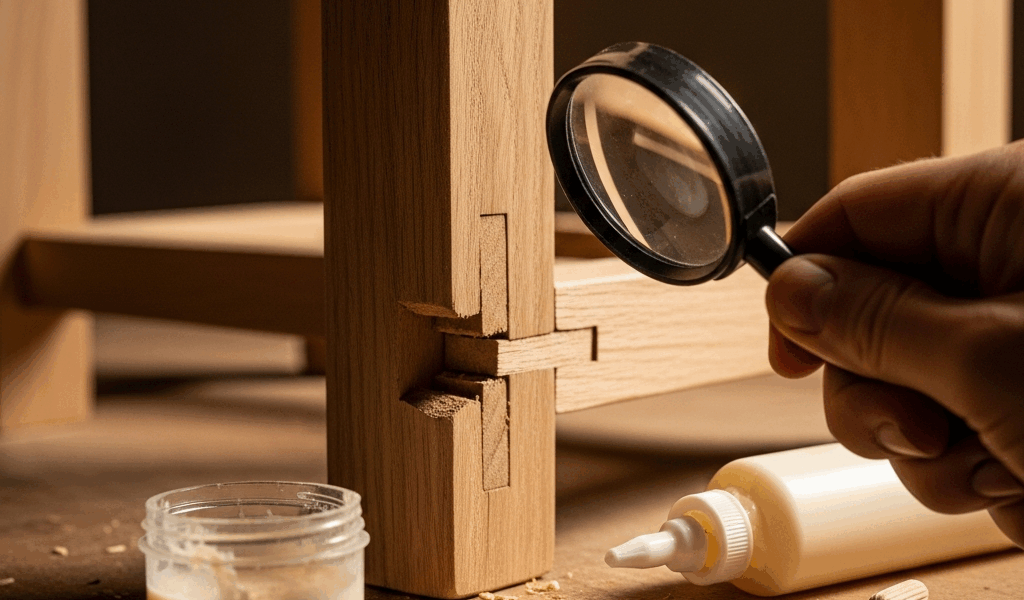
Mark the joint with a pencil immediately. I’m apparently forgetful enough that I also put a small strip of blue painter’s tape on the rail — Scotch brand works for me while regular masking tape never stays put on older finishes. Skip past the mistake I made of getting halfway through a repair and losing track of which joint you were actually fixing.
Fixing a Loose Tenon or Dowel Joint
Once you’ve identified the joint, your next decision shapes the entire repair: inject or disassemble.
But what is injection repair? In essence, it’s feeding thin glue directly into the gap without taking the chair apart. But it’s much more than that — it’s also the faster, lower-risk option when the wood itself is still sound.
Injection works best when you can access the joint from outside without disassembly. A 1.5-inch mortise-and-tenon connecting a rung to a leg is a prime candidate. Thin cyanoacrylate — I use Starbond EM-02, which runs about $12 for a two-ounce bottle — or hide glue thinned with water both work here. I feed it in using a veterinary syringe, no needle. You can grab a pack of five on Amazon for maybe $3. They hold exactly the right amount.
Wrap the joint with painter’s tape first. Drill a small pilot hole — 1/16-inch — into the joint at an angle that reaches the glue line. Insert the syringe tip. Inject slowly. Watch for glue to seep out the opposite side — that’s your signal the joint is fully flooded. Clamp immediately. I wrap a rubber bungee cord around the joint and frame for even pressure without marring a finished surface. Leave it overnight. Minimum twelve hours.
Injection only works when the wood is still sound, though. A tenon that’s shrunk significantly can’t be saved with glue alone. You’ll chase that same squeak again in six months.
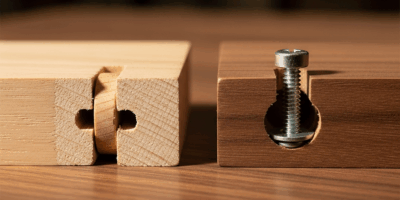
Frustrated by a joint that kept failing, I eventually started disassembling them completely — using a rubber mallet and a scrap of hard maple as a buffer so the mortise doesn’t split. This new approach took hold several years into my repair work and eventually evolved into the proper process that chair enthusiasts know and trust today. Once it’s open, inspect the tenon. Undersized or crushed wood means you wrap the tenon with a single layer of veneer — 0.040-inch cherry or walnut — and glue it back. The veneer swells the tenon just enough to restore pressure. Severe damage means milling a fresh tenon from matching stock. An extra hour of work. Problem solved permanently.
For fresh glue, hide glue reactivates when heated — useful for future repairs. Titebond III gives you more open time, about 8 to 10 minutes, which helps when you’re juggling clamps. Use a web clamp or rope tourniquet to distribute force without crushing the surrounding wood.
Dealing with Seasonal Movement and Dried Glue
Older chairs squeak for a different reason entirely — the glue failed through no fault of the joint geometry. My grandmother had a 1940s dining set, eight chairs, solid walnut. She lived in Colorado her whole life. Low humidity, constant seasonal swings between 15% and 60% relative humidity. The original hide glue simply desiccated and separated. That was 2008 when she finally called me about it.
You can usually feel the difference between this and a mechanical failure. Grasp the joint and apply pressure — a loose tenon wobbles noticeably. Dried glue keeps the joint tight, but you still hear the squeak. The wood isn’t moving much. Fractions of a millimeter. It’s enough.
One option worth trying first is rehydration. Inject hot water or thinned hide glue directly into the joint and clamp it. Heat and moisture can wake up old adhesive and help it re-bond. It doesn’t always work — sometimes the glue has crystallized beyond saving — but it takes twenty minutes and costs nothing. Worth the attempt on a valuable piece before committing to full disassembly.
If rehydration fails, pull the joint apart. Same process as before — disassemble, clean old glue thoroughly with a sharp chisel or card scraper, re-glue with fresh adhesive. The difference here is that you’re not fixing a mechanical problem. Joint geometry is still fine. You’re just replacing failed adhesive and giving the wood a clean surface to actually bond to.
When the Squeak Comes Back After Repair
Repeat failures within a few months usually mean one of two things: the original diagnosis was wrong, or the joint has hidden damage that glue alone can’t address.
A stretcher that’s been squeaking for years actually wears the mortise walls. They become compacted, fuzzy, and loose. Fresh glue won’t grip wood in that condition — at least not for long. The compression damage is structural now.
While you won’t need a full cabinet shop for most chair repairs, you will need a handful of proper tools at this stage. Two-part structural epoxy — I use West System 105 with 205 hardener, about $45 for a small kit — can fill the gap and lock the joint permanently. It’s not reversible, though. If the piece ever needs work again, you’ve made the next repair significantly harder.
The honest fix is a replacement tenon or rung. Or, if the frame has multiple failing joints, a full strip-and-reglue of the entire chair. That’s a weekend project — not an afternoon one.
I’ve learned not to oversell any of this. A $15 syringe and an afternoon might genuinely solve your problem. Or you need a full weekend, a set of clamps, and some patience. Diagnosis tells you exactly which world you’re actually in — and skipping that step is how a simple fix turns into three separate repair attempts.


Stay in the loop
Get the latest artisan furniture makers updates delivered to your inbox.