
Why Wood Filler Cracks in the First Place
Wood filler has started getting harder to follow with all the competing products and conflicting advice flying around. As someone who has botched more than a few repairs on furniture I actually cared about, I sat down and learned why filler fails. Today, I will share it all with you.
Here’s the short version: most fillers shrink as they cure. That’s just the mechanical reality. Water-based formulas lose moisture — sometimes 20% or more by volume — and contract. Epoxy fillers cure through a chemical reaction that trims mass slightly. Two-part polyurethane expands first, then settles back down. The crack you’re staring at didn’t appear randomly. Something specific went wrong during application, product selection, or wood prep.
Diagnosing which cause applies to your situation is the only thing that will actually solve it. Sand and reapply without knowing why it cracked, and you’ll watch it crack again. Same spot. Same fault line. Frustrating every time.
You Applied It Too Deep in One Pass
This is the most common culprit. I made this exact mistake for years before a guy at a lumber yard in Columbus finally called me out on it — right there between the dowels and the sandpaper aisle.
Most water-based wood fillers have a maximum recommended depth of 1/4 inch per application. Minwax High Performance Wood Filler — probably the most widely used product in North America — says it explicitly on the can. Bondo Wood Filler caps out at 1/8 inch per pass, stricter still. Go deeper in one shot and the bottom layers dry slower than the surface. The surface hardens first and starts contracting, while the interior is still shrinking. That differential stress splits the filler right down the center — usually running lengthwise through the void.
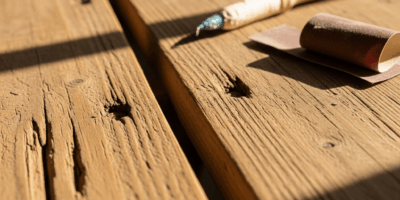
The crack pattern is distinctive. A clean line, often straight, sometimes slightly curved depending on fill shape. Not spiderwebbing. Not edge separation. One primary fault line. You’ve seen it.
The fix: Remove the cracked filler entirely. A putty knife works, or a chisel, or a rotary tool with a small 1/8-inch bit if the void is deep. Sand the cavity clean afterward. Now apply thin layers — think 1/8 inch, maybe 1/4 inch at absolute maximum depending on what your product label says. Let each layer dry completely before adding the next. Minwax typically needs 2–4 hours between coats under normal conditions. Check the can. Don’t guess.
Yes, this takes longer. It’s also the only approach that actually holds.
The Wood Moved After the Filler Cured
Wood expands when humid, shrinks when dry. Your filler doesn’t. It stays exactly the same size once it’s cured — that’s the whole problem.
Frustrated by recurring edge cracks? This is probably your culprit. You’ll see it most on solid wood furniture — large fills on tabletops, cabinet sides, anywhere the grain runs perpendicular to the repair. The filler either cracks around its perimeter or pops clean out of the void like a cork. The surrounding wood moved. The filler didn’t. That’s what makes wood movement so endearing to us woodworkers — it keeps humbling us no matter how long we’ve been at it.
It hits hardest in seasonal climates where humidity swings 30% or more between winter and summer. Less of an issue in climate-controlled spaces.
The fix depends on void size. For gaps under 1/2 inch wide, acclimate the wood first — store the piece in the room where it will actually live for at least a week before filling. That lets the wood reach equilibrium with local humidity. Then fill. For larger voids over 1 inch, especially anything structural, consider two-part epoxy instead. It doesn’t shrink the way water-based fillers do, and it bonds mechanically to wood fibers, resisting that expansion-contraction cycle far better.
Exterior work or high-moisture environments? Epoxy or marine-grade polyurethane. Period. Water-based fillers will fail out there.
You Used the Wrong Type of Filler for the Job
But what is the right filler, exactly? In essence, it’s the product chemically matched to your specific wood and environment. But it’s much more than that — and this is where I see the most confusion, probably because all these products look nearly identical on the store shelf at $8.99 a tub.
Water-based wood filler — Minwax, DAP Fast ‘N Final, Elmer’s — works well on pine, birch, and other receptive softwoods with open grain. It does not stick to oily woods like teak, rosewood, or finished mahogany. The wood’s natural oils repel the water-based binder, so the filler never bonds properly. Once it dries and shrinks, it cracks — because there was never enough adhesion holding it in place to begin with.
Wood putty is different. Oil-based or solvent-based, not water-based. Dries slower, shrinks less, sticks to finished surfaces and oily woods. Softer though, which makes it worse for structural gaps.
Epoxy filler is two-part, water-resistant, and the strongest of the three. Overkill for a nail hole in baseboard trim. Exactly right for exterior cracks, end-grain repairs, or high-movement situations.
Concrete examples:
- Filling a nail hole in pine baseboard before painting? Water-based Minwax. Fast, sandable, takes paint beautifully.
- Repairing an old teak sideboard with an oil finish? Use Timbermate or a solvent-based putty. Water-based will crack within weeks.
- Large void on an exterior door frame? Two-part epoxy. Nothing else will last out there.
Here’s the part worth saying first. Wrong product causes most repeat failures — the underlying bond was never sound to begin with, so nothing applied on top of it had a chance.
How to Fix Cracked Wood Filler Without Starting Over
Not every crack demands full excavation. Small hairline splits in otherwise solid, well-bonded filler can often be filled over without tearing everything out — at least if the original application is genuinely still attached.
First, assess the bond. Press on the filler with a putty knife. If it flexes, crumbles, or shifts at all, it’s lost adhesion. Pull it out entirely. If it’s hard and fixed in place, you can work with it.
Lightly dampen the cracked surface with a barely damp sponge — not wet, just damp. This softens the top layer slightly. Wait about a minute. Then apply a thin coat of fresh filler directly into and over the crack. The moisture on the old surface helps the new layer bond rather than just sitting on top like a skin.
I’m apparently sensitive to over-dampening and the Minwax version works for me here while the DAP formula never bonds correctly when I try the same technique. Steer clear of where I went wrong — test on scrap if you’re switching products.
This is a rescue technique, not a permanent fix for deeper systemic problems like depth errors or wood movement. One last thing before you fill again: figure out why it cracked in the first place, or you’ll be back here in three months wondering what went wrong.

Stay in the loop
Get the latest artisan furniture makers updates delivered to your inbox.