What the Gap Is Actually Telling You
Dovetail joinery has gotten less clear-cut with all the conflicting advice flying around. I spent three years blaming my chisels before I finally looked at what was sitting right in front of me. The gap itself. It’s a diagnostic tool — and where it sits tells you exactly what failed.
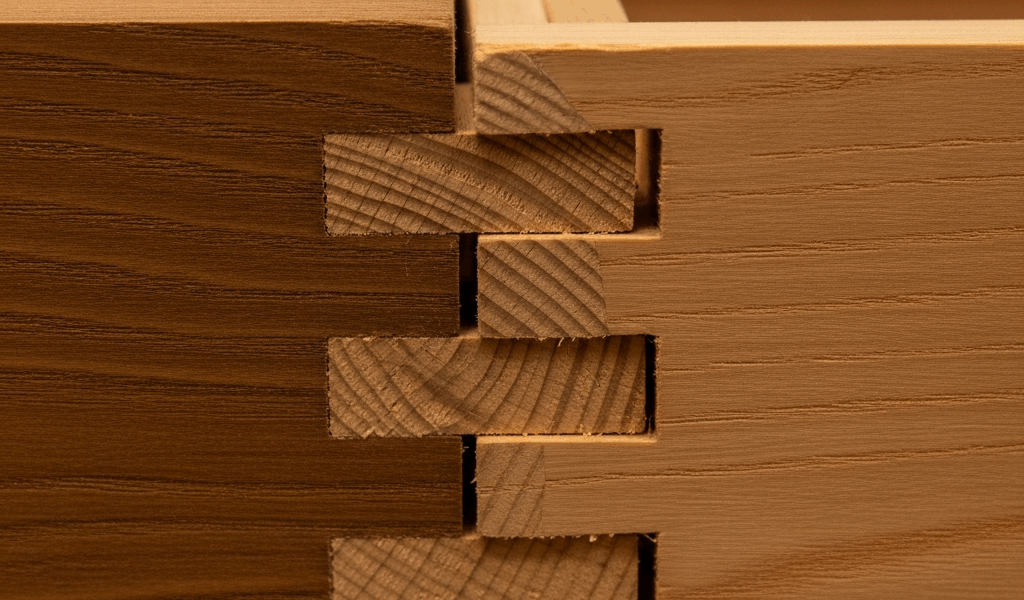
But what is a dovetail gap, really? In essence, it’s evidence of one specific mistake made at one specific moment. But it’s much more than that. A gap running along the baseline — where the tails or pins meet the horizontal surface — means your marking was off somewhere early. A gap opening along the pin walls or tail walls means your chisel didn’t reach the line cleanly. A gap that only shows up after the glue dries? That’s moisture leaving the wood. Three completely different problems. Three completely different fixes.
Most dovetail tutorials walk you through cutting a perfect joint from scratch. Nobody talks about standing in the workshop at 7 p.m., staring at a dry-fitted joint with a 0.75 mm gap running down the left side, wondering whether you’re starting over or salvaging what you have. That’s where this article lives.
Marking Errors That Set You Up to Fail
Marking errors are invisible until they aren’t. You can execute flawless chisel technique and still end up with gaps if your baseline drifted half a millimeter on one corner. That’s what makes precision marking so maddening to us woodworkers — the mistake happens long before anything looks wrong.
The culprit is usually one of three things. First: a marking gauge that drifts. I used a cheap plastic gauge from a big-box store for two full years. Thought the price tag meant it worked well enough. It didn’t. The fence rode inconsistently along the edge, and by the time I’d marked the eighth dovetail in a sequence, the baseline had wandered 0.4 mm from where it started. The fix was immediate — a Starrett 66 solid brass gauge, around $38. The difference between that and the $12 plastic version is the difference between a baseline you can actually trust and a baseline that’s basically a suggestion.
Second problem: transferring tails to pins using only a knife line. Honest mistake, and I made it constantly. A sharp knife isn’t enough on its own. When you knife-mark directly onto the pins, the blade slips slightly into softer wood but catches differently on harder species. That 0.3 mm inconsistency compounds across all four corners fast. Mark your baseline on both pieces using a gauge set to the exact same material thickness. Check it. Mark again. Check once more before the saw ever comes out.
Third: reproducing the baseline distance using calipers or a ruler instead of working directly from the wood. Don’t. Every piece moves a little during milling — even when it looks stable. Set your gauge to the actual surface you’re holding, not to a number you measured somewhere else. Takes an extra 90 seconds. Eliminates an entire category of error.
Gaps from marking errors usually sit right at the baseline. You’ll catch it immediately in a dry fit: the tails go in partway, hit a shoulder, and stop. Under 0.5 mm, you can sometimes close it by paring a hair-thin layer off the pin board shoulder. Over 1 mm, you’re recutting. Simple as that.
Chisel Work Mistakes That Create Hidden Gaps
Clean chisel work and a tight dry fit are not the same thing. I confused one for the other for about six months. Learn from what tripped me up.
The most common chisel error is undercutting too aggressively. You pare the walls at a slight inward angle — 4 to 6 degrees — so the high edges seat first and the joint closes all the way. Aggressive undercutting feels satisfying. The dry fit slides together smoothly and easily. It’s also a trap. Clamp pressure then asks the joint to flex slightly to close the remaining gap. Wood doesn’t cooperate with that request. Instead it crushes locally, hides the gap during assembly, and reveals it again once the clamps come off and the wood rebounds.
The counterintuitive fix: pare to the line cleanly with maybe 2 to 3 degrees of angle. Nothing more. The dry fit will be noticeably tighter. The joint will probably require a mallet for final seating. That’s correct — that’s exactly what you want.
Second chisel error is leaving fuzz on the end grain. End grain is more open-pored than long grain, and paring across it leaves tiny fibers standing. These compress under dry-fit pressure, making the joint feel snug. They spring back the moment you release it, reopening the gap. Use a genuinely sharp chisel — stropped-five-minutes-ago sharp, not just honed-last-Tuesday sharp — and make one clean paring pass across the end grain. Wipe the surface with a barely damp rag afterward, let it dry completely, and lightly pare again. Sounds fussy. Works every time.
Gaps from chisel problems run along the pin or tail walls, not at the baseline. You’ll see it in a dry fit: the joint slides in easily, bottoms out, and tapping gently with a rubber mallet changes nothing. That’s your signal — stop, examine the walls under good light, and re-pare the offending surface before you do anything else.
When Wood Species and Grain Direction Are the Problem
Softer woods absorb errors that harder woods reject outright. Pine crushes under clamp pressure. Hard maple doesn’t. I’m apparently a “just switch species mid-project” type of woodworker, and eastern white pine works for me aesthetically while hard maple never forgives sloppy baselines the same way.
I built a small jewelry box in eastern white pine after years working primarily with poplar and hard maple. Everything felt right during the dry fit — genuinely snug. Then I applied clamp pressure. Nothing extreme, just hand-tight. Watched the baseline compress by 1.2 mm under each clamp. Six hours later, after the clamps came off, that compression had rebounded to roughly 0.8 mm of visible gap. The wood hadn’t moved in any dramatic sense — it had simply crushed and then expanded as stress released. A pine joint needs tighter baseline work than a maple joint, and considerably less aggressive clamping pressure.
Wild grain compounds everything. If your tail board has grain running uphill toward a corner, paring across it will cause tearout regardless of how sharp your chisel is. You’ll leave a divot, try to smooth it, and end up rounding the corner slightly. The joint no longer seats fully because the geometry changed on you. Pare from the other direction when you can, or at a much shallower angle. Sometimes the only real fix is accepting the tearout and sanding flush after assembly — which you shouldn’t do, but which people absolutely do.
Fix It or Recut — How to Decide
Worth saying out loud. So, without further ado, here’s the actual decision framework.
Gaps under 0.5 mm along the baseline can usually be closed with strategic clamping. Use cauls — flat boards on both sides of the joint — to distribute pressure evenly across the surface. Clamp perpendicular to the gap. If hand-tight pressure won’t close it, stop. You’re not fixing anything at that point; you’re hiding it temporarily.
Gaps under 0.5 mm along the walls can be managed with sawdust-and-glue filler. Mix fine dust from your planer with epoxy or standard wood glue, work it into the gap before final assembly, and sand flush after curing. Works best on closed-grain woods. Works worst on open-grain woods like oak, where the contrast becomes obvious.
Gaps over 1 mm need recutting. Full stop. I’ve tried shimming tails — gluing a thin veneer to the tail face and re-cutting the angle. It occasionally works. More often you end up with a visibly thicker joint and a gap somewhere else entirely. Recut. It takes two hours. A bad joint lasts forever.
Before starting over, ask yourself one honest question: do you actually know what went wrong, or did you just get unlucky with wood movement? If you can’t answer that clearly, cutting again won’t help. Fix the variable first. Then cut.


Stay in the loop
Get the latest artisan furniture makers updates delivered to your inbox.