What a Cracking Joint Is Actually Telling You
Mortise and tenon joinery has become harder to navigate with all the conflicting advice flying around. But here’s the thing nobody says plainly: your joint isn’t cracking because you cut it wrong. It’s cracking because of what happened after you glued it together.
Not during the fit check. Not at the vise. After.
As someone who’s built furniture professionally for over a decade, I spent real time learning the ins and outs of why these joints fail — usually by failing them myself. Today, I will share it all with you.
Most woodworking content assumes the joint fails at assembly. It doesn’t. I’ve watched joints seat perfectly, glue cleanly, then develop a hairline crack six months later inside a climate-controlled living room. The crack is telling you something. You just need to read it correctly.
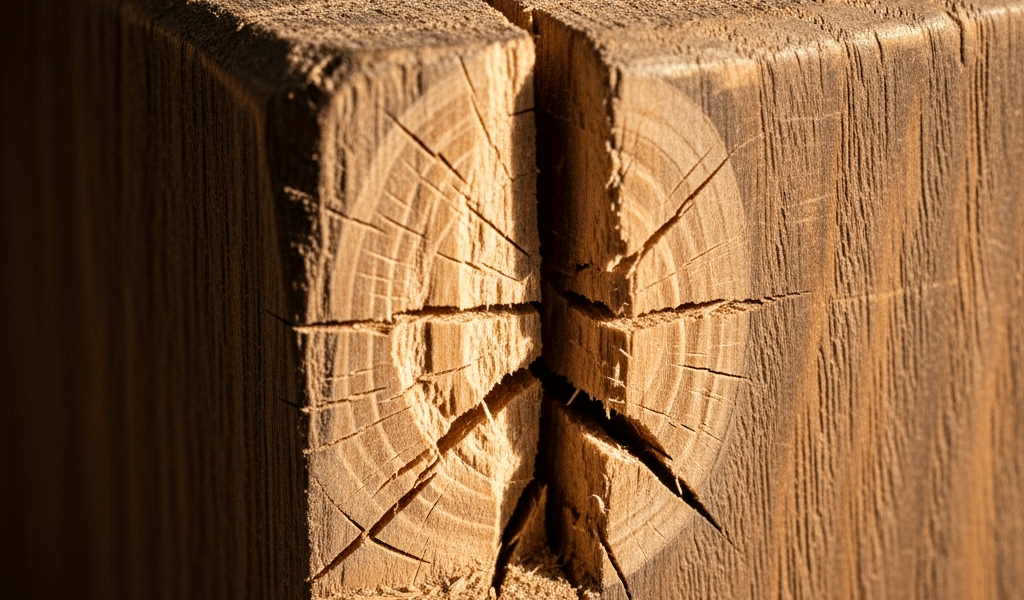
Two patterns show up consistently. First: cracks running along the tenon cheek, parallel to long grain — almost always moisture-related. Second: cracks at the shoulder line, perpendicular to grain, radiating outward from the mortise opening — these usually point to seasonal wood movement or glue-surface prep failures. That’s what makes identifying the right pattern so valuable to us woodworkers. The fix is completely different for each. Chasing the wrong diagnosis wastes time and wood.
So, without further ado, let’s dive in.
Moisture Content Mismatch Is Usually the Real Problem
Here’s the part worth saying first. Moisture content mismatch is the most common reason joints crack — and it’s invisible until suddenly it isn’t.
Here’s the scenario. You mill your stock. Maybe it arrived from your supplier at 12% moisture content — reasonable for kiln-dried hardwood. But you didn’t measure it. You brought it into your 68-degree, 35%-humidity shop and started working. Three weeks later, the wood has acclimated to 6–8% equilibrium moisture content. You cut your mortises and tenons. Everything fits perfectly.
You glue the joint and clamp overnight. Mortise: 6–8% MC. Tenon: 6–8% MC. They’re married.
Then the piece ships to its final home — a heated house in January running 25% relative humidity. The tenon shrinks faster than the mortise walls because it’s a smaller mass with more exposed end grain. Radial shrinkage pulls across the tenon cheeks. The mortise walls hold relatively stable. The joint opens. Hairline crack, right along the cheek.
I learned this building a walnut table base back in 2019. I measured the tenon shoulder thickness — 0.75 inches, right on spec — and completely ignored the MC of the stock. Spare yourself the wrong turn I took. The table went to a client in Colorado. November rolled around, the dry heat kicked on, and I got an email with a photo attached. Crack right along the tenon cheek, exactly where physics said it would be. I knew it the second I saw the image.
The fix is mechanical. Use a moisture meter — at least if you’re building anything intended for indoor use. They’re affordable now. A Lignomat Mini Ligno S/DX runs about $100 and reads accurate to ±1%. I’m apparently a “measure twice, cut once” type and that meter works for me while eyeballing wood condition never does. Measure your stock when it arrives. Measure again after milling, before layout. You want 6–8% MC for furniture living in a climate-controlled interior. At 10% or higher, leave the stock in your shop for three weeks minimum before cutting any joinery.
This is not optional. This is foundational.
Glue Surface Prep Mistakes That Guarantee Failure
Mortise cheeks and tenon cheeks are not equal surfaces. Treating them the same way is a mistake most people make exactly once.
But what is a burnished surface? In essence, it’s what happens when your thickness planer blade compresses end-grain fibers flat during a final pass. But it’s much more than that — it’s a glue-adhesion problem waiting to happen. The fibers compress, the surface takes on a slight shine, and the glue has nothing to grip. This is especially true on dense woods like curly maple or figured walnut. You see the shine on those cheeks. That shine is the warning.
The fix is simple. After your final planer pass, take one or two light strokes across the tenon cheeks with a sharp #5 jack plane — a 0.01-inch shaving is enough to raise grain texture without creating fuzz. No jack plane handy? Sand with 80-grit at 45 degrees to the grain. That breaks the burnish and gives the glue mechanical tooth to bond to.
Mortise walls are different. Chiseled surfaces have natural texture — you don’t need to prep them the same way. What you do need to avoid is over-gluing the mortise opening. I know the instinct. Load the joint, maximize strength. Wrong. Excess glue builds hydraulic pressure inside the mortise cavity during clamping, pushing outward against the walls. On a narrow mortise in dense hardwood, that pressure can crack the walls outright. The crack stays tight if the wood is at equilibrium MC, then opens when seasonal movement cycles through. You won’t even connect it to the assembly day.
A thin coat on the tenon cheeks and a light brush-out on the mortise walls is enough — at least if you want a joint that holds long-term. The excess gets squeezed out regardless.
How Seasonal Wood Movement Stresses the Joint Over Time
A wide tenon resists wood movement in both directions. That resistance creates stress. That stress accumulates.
When the mortise member swells with seasonal humidity and the tenon member wants to stay put, the shoulder line bears load it was never designed for. Cracks radiate from the mortise opening, perpendicular to the tenon grain. Spring brings humidity — the joint closes slightly. Winter brings dry heat — it opens again. After three to five years of cycling, the wood fibers at the shoulder line fatigue. The crack becomes permanent.
That’s what makes seasonal cracking so frustrating to diagnose. It doesn’t appear right away. It appears two winters in, and by then you’ve forgotten every detail of the original build.
Prevention comes down to design choices more than glue choices. On cross-grain construction — a table apron mortised into a leg, for example — keep tenon width at 2 to 3 inches maximum for domestic hardwoods. White oak, ash, walnut — species that move significantly — need tenon shoulders at 0.5 inches or thicker to distribute stress across a wider bearing surface. A 4-inch-wide tenon in flat-sawn white oak is asking for this exact failure.
If your piece is already cracking seasonally, you’re fighting physics. The crack will persist until you disassemble and rebuild with a design that accommodates movement. There’s no repair that changes the underlying geometry.
How to Fix a Cracked Mortise and Tenon Without Full Disassembly
Not every crack means starting over. Some cracks are stabilizable — at least if they’re caught early and haven’t grown.
A hairline crack along the tenon cheek that appeared after a year and hasn’t moved can be stabilized with liquid hide glue injected thin. Use a syringe, work the glue into the crack, apply light clamp pressure for 24 hours. The joint won’t be stronger than new, but it will be sealed against moisture infiltration and seasonal dirt accumulation — both of which accelerate deterioration.
Thin cyanoacrylate — the CA-3 viscosity, not the thick gap-filling stuff — also works for hairline cracks under 0.01 inches wide. Capillary action pulls it into the joint on its own. No clamping required. Let it cure for a full hour before handling.
Wider than 0.03 inches, or still growing seasonally? The joint is past the point of surface repair. You need to disassemble, remill one or both parts, and reassemble with MC-matched stock and proper glue surface prep. That means starting this whole process correctly from the beginning.
Going forward: measure moisture content before layout — every time. Hand-plane your tenon cheeks after thickness-planing. Apply glue sparingly. Keep tenon width within species-appropriate limits. Your future self, and your clients, will thank you.


Stay in the loop
Get the latest artisan furniture makers updates delivered to your inbox.