What Actually Causes Bubbles in a Wood Finish
Getting a smooth wood finish has started getting harder to follow with all the conflicting advice flying around. As someone who has ruined more than a few tabletops chasing that glassy, perfect coat, I spent real time learning the ins and outs of what makes finishes bubble. Today, I will share it all with you.
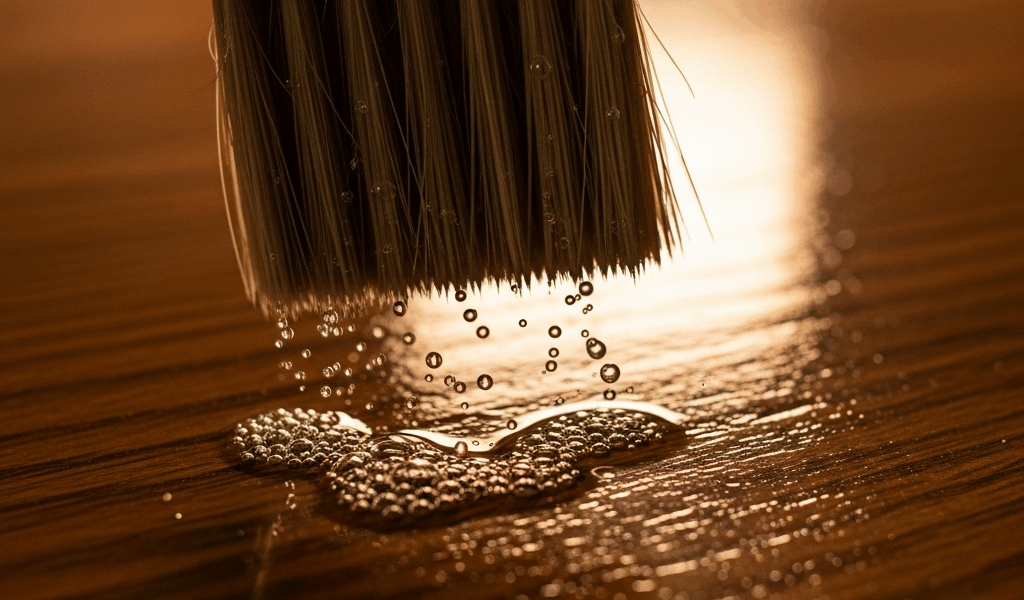
You lift your brush. That’s when you see them — tiny spheres rising through the wet coat like a shaken soda, collapsing into craters that’ll stay there once the finish hardens. But what causes bubbles? In essence, it’s a combination of three distinct culprits. But it’s much more than a simple fix.
Air gets whipped in by brushing too fast. Drag a loaded brush across wood at speed and you’re not applying finish — you’re beating it like eggs. The motion itself creates the problem.
Outgassing is the sneaky one. Moisture or volatile compounds trapped inside the wood rise to the surface as the finish dries. The wood breathes — always has. Those gases push upward through the wet coat and pop as they escape, leaving behind a pitted surface that’s genuinely demoralizing to look at.
Temperature and humidity mistakes are invisible until they’re expensive. Cold rooms slow evaporation, locking air bubbles in place. High humidity wrecks the drying speed entirely. Apply polyurethane at 55°F instead of 70°F and you’ve changed the entire chemistry of what’s happening on that surface.
Bubbles in Polyurethane Finish and How to Stop Them
Water-Based Polyurethane
Water-based poly bubbles more aggressively than its oil-based cousin — water itself has higher surface tension, so the finish doesn’t flow out as easily and bubbles stay trapped longer. I’m apparently sensitive to this particular problem, and Varathane water-based poly exposed every bad habit I had. My synthetic brush bristles created foam across an entire kitchen table refinish, and I spent two hours staring at a surface that looked like pumice stone. Avoid the path I took.
Use natural bristle brushes, not synthetic. Natural bristles flex differently — they drag the finish smoother rather than whipping air into it. Thin your first coat with water at the manufacturer’s ratio, usually somewhere between 5 and 10 percent. Work in long, deliberate strokes and don’t go back over wet areas. Let gravity do the leveling. That’s what makes water-based poly endearing to us patience-challenged woodworkers — when you leave it alone, it actually behaves.
So, without further ado, let’s get into oil-based.
Oil-Based Polyurethane
Oil-based bubbles almost always trace back to one mistake: shaking the can. That’s it. Shake a gallon of oil-based poly and you’ve introduced microscopic air throughout the entire thing. Use a stir stick instead. Go slow. Seriously.
Important part first, because shaking is the most common error I see people make at the hardware store before they even get home.
Apply oil-based poly with a natural bristle brush. Thin the first coat by 10 to 15 percent using mineral spirits or whatever thinner the manufacturer specifies — not a substitute. Work in thin, overlapping passes. Heavy coats trap air. The second coat covers what the first one missed, so stop trying to do everything at once.
Temperature matters more with oil-based finishes than most people realize. Stay between 65°F and 85°F. Below 60°F the oils won’t cure right and bubbles will stick around. Open windows if the room is cold, or wait for a warmer day. Humidity below 50 percent is ideal.
Bubbles in Lacquer or Shellac Finishes
Lacquer Bubbles
Lacquer bubbles are solvent-related. Spraying too fast or too close forces the thinner to escape before the finish has any chance to level out — it’s the spray version of aggressive brushing, except faster and more destructive.
While you won’t need professional spray equipment, you will need a handful of proper settings dialed in. Back the air pressure off to 25 to 30 PSI unless the manufacturer says otherwise. Maintain 6 to 8 inches from the wood surface. Use the exact thinner ratio listed on the can — not more, not less.
I’m apparently someone who learns things the hard way. Mixed the wrong thinner into lacquer once and spent an afternoon watching it bubble like something alive. Complete waste of a Saturday and about $40 in materials. Stick to what’s on the label.
One real advantage with lacquer: bubbles sometimes pop on their own if the room stays warm. Apply at 70°F or above and the solvent keeps evaporating, collapsing those bubbles on its own. Don’t count on it as a strategy, though. Prevention beats any self-healing the finish might do.
Shellac Bubbles
Shellac bubbles usually mean contaminated flakes or alcohol that’s too strong. But what is shellac mixing, really? In essence, it’s dissolving flakes in ethanol — and the purity of both materials matters more than most tutorials admit.
Use dewaxed flakes only. Waxed flakes carry residue that causes bubbling and adhesion failures. Zinsser dewaxed shellac flakes run about $18 per pound — worth every cent compared to stripping a ruined finish. Buy from a reputable supplier and don’t improvise.
Use denatured alcohol, not rubbing alcohol. The evaporation rate of denatured alcohol is calibrated for shellac application. Anything else and you’re essentially guessing at the chemistry.
How to Fix Bubbles That Have Already Dried
Most guides stop at prevention. That’s genuinely unhelpful if you’re already looking at a ruined surface. Here’s what actually works.
Minor bubbling — scattered craters across a large area — responds well to wet sanding with 320-grit paper. Use a sanding block with water or mineral spirits as lubricant. Sand lightly until the bubbles sit level with the surrounding finish. Wipe clean, let it dry completely, then recoat with the same finish. New coat bonds over the repair and hides it.
Severe bubbling across 30 percent or more of the surface means stripping, full stop. One gallon of Jasco stripper runs about $12 at most hardware stores. Two hours of stripping beats three days of sanding and recoating damage that’s too widespread to fix any other way. Strip it, sand smooth, start fresh.
One critical step people skip — and I skipped it twice before learning — is this: after wet sanding, the wood absorbs water and the grain raises. Let it dry 24 hours. Then sand again with 320-grit, very lightly, to knock down that raised grain. Then recoat. Skip this step and your final finish will feel like sandpaper no matter how many coats you apply.
Application Habits That Prevent Bubbles Every Time
- Sand to 180-grit minimum. Dust thoroughly. Wait 30 minutes before finishing — volatile compounds need time to escape the wood surface.
- Stir finishes, never shake. A paint stick works fine. An electric mixer at low speed works better.
- Thin the first coat by 10 to 15 percent using only the specified thinner. No substitutions.
- Natural bristle brushes for oil-based finishes. Natural or quality synthetic for water-based.
- Apply between 68°F and 75°F. Keep humidity between 40 and 50 percent.
- Long, deliberate strokes only. Don’t overwork the finish once it’s laid down.
- Let each coat cure fully before recoating. Read the label. Don’t guess at dry times.
Bubbles aren’t a finish problem. They’re an application problem — every time. Control the variables and the finish handles itself.


Stay in the loop
Get the latest artisan furniture makers updates delivered to your inbox.