
“`html
Why Gaps Form Between Your Tabletop Panels
I’ve been building tabletops for fifteen years, and here’s what I’ve learned: gaps between wood panels aren’t a failure. They’re a conversation between the wood and the humidity in your workshop. Wood moves. Always. Until you accept that as fundamental physics rather than a manufacturing defect, you’ll keep making the same mistakes I made early on.
Here’s the thing about wood movement — it shrinks and swells across the grain, not along it. A 12-inch-wide walnut board can move nearly a quarter inch in width across a season while staying almost perfectly stable along its length. That’s why a solid tabletop made from edge-glued boards will always develop gaps or cupping. The wood is doing exactly what wood does.
Humidity cycling causes this whole mess. Winter drops indoor humidity to 20–30%. Summer pushes it to 60%+. Your tabletop absorbs and releases moisture constantly, and since wood expands and contracts at different rates depending on grain orientation, stress builds up. Most woodworkers underestimate how much movement happens. A walnut panel 24 inches wide can move up to 3/8 inch over a year in an uncontrolled environment — that’s genuinely shocking the first time you measure it.
Species mismatch makes everything worse. I learned this the hard way mixing red oak with walnut on a client’s dining table — never again. Oak moves roughly twice as much as walnut in response to humidity changes. When you glue them edge-to-edge, they fight each other. The oak wants to swell; the walnut resists. Something has to give. Usually it’s a gap, sometimes a crack.
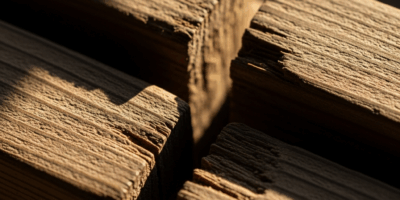
But what are gaps, really? In essence, they’re spaces between panels. But it’s much more than that. There are two distinct gap types, and this distinction matters for your fix. Assembly gaps appear immediately after you clamp the table together — usually because panels weren’t jointed perfectly flat, or you didn’t account for wood thickness variation. Movement gaps emerge weeks or months later as humidity cycles occur. Movement gaps are normal. Assembly gaps are preventable.
Diagnose Your Gap Type Before You Fix It
This section matters more than any fix. Wrong diagnosis equals wasted time. Honestly, I wish someone had forced me to work through this checklist twenty years ago instead of jumping straight to band-aids.
Start with timing. When did the gaps appear? If they were there the moment you unclamped, you have an assembly problem. If they showed up three months after the client took the table home, you have a movement problem. The fixes differ completely.
Next, examine consistency across all your joints. Are all gaps roughly the same size, or is one panel creating a canyon while others fit tight? Uniform gaps across all joints suggest humidity-driven movement. A single large gap between two panels — that’s different. Those boards didn’t joint properly, or one is cupped.
Check for cupping by placing a straightedge across the width of each panel. Press down on the edges. If the center sags, the panel is cupped. Cupped panels will gap out even if perfectly jointed, because the glued edge-joints are now under tension. This is a different problem than simple seasonal movement.
Measure the gap size using feeler gauges or a caliper. Under 1/8 inch? Between 1/8 and 3/16? Larger than 1/4 inch? This determines which fixes are cosmetically acceptable. A 1/8-inch gap can nearly disappear with the right stain and finish. A 3/8-inch gap becomes furniture surgery.
Look at the grain direction on the table surface — did you plan panels so grain runs the same direction on all boards? If adjacent panels have grain running perpendicular, they’ll move in different amounts and create visible stress. This is subtle but important.
Quick Fixes for Immediate Gaps You Can Hide
You need this done. The client is coming to pick up the table next week. Here’s what actually works without rebuilding.
Veneer strips work for gaps under 1/8 inch — at least if you want something invisible from above. Source veneer that matches your wood species as closely as possible. Walnut veneer runs about $18–$28 per bundle, depending on thickness. Plane or sand the strip to 1/16-inch thickness, glue it into the gap with yellow glue (Titebond II is what I use for every tabletop job), and clamp it flat for 24 hours. Sand flush once dry. The joint becomes invisible from above if your finish is consistent.
That’s what makes this approach endearing to woodworkers. The limitation? This shows from the table’s edge. If it bothers you, inlay a contrasting veneer instead. A 1/8-inch mahogany strip in a walnut gap becomes a feature rather than a repair. Clients appreciate this honesty.
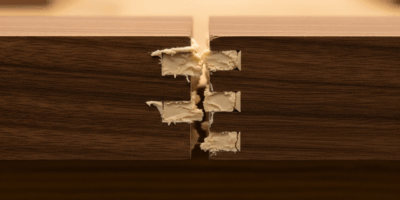
Colored epoxy fills medium gaps (1/8 to 3/16 inch) very well — probably the fastest solution for gaps in that range. Mix two-part epoxy with wood dust from your shop — the same species as the tabletop. I use a 3:1 epoxy-to-dust ratio by weight to get a paste. Fill the gap slightly proud, clamp the joint flat, let it cure 24 hours, then sand flush. The wood dust particles hide the epoxy’s plastic appearance.
Expect this to show under side lighting due to slight color mismatch, but most homeowners won’t notice during daily use. I’m apparently picky about this and Titebond II works for me while epoxy never quite hides right.
Dutchman patches solve large or multiple gaps — this is genuine woodworking, not a patch. Cut a rectangular patch (I typically work with 1/4-inch thickness) from the exact same board as your panels if possible. Chisel a matching mortise into the gap, glue the patch in, clamp it, and sand flush. A Dutchman patch cut from matching stock is genuinely invisible once finished.
Time investment: 45 minutes per patch, including dry fit and cleanup.
Long-Term Solutions That Account for Wood Movement
Probably should have opened with this section, honestly. These strategies prevent gaps from forming at all, which beats fixing them every time.
Breadboard ends are the traditional answer — they’ve worked for centuries for good reason. Instead of gluing panels edge-to-edge across the grain, you glue them edge-to-edge along the grain (which moves very little) and let the tabletop panel float freely beneath a frame. The breadboard ends stay stable while the top panel expands and contracts across its width within the frame. I use this on every dining table I build now. The breadboard is visible, so it becomes part of the design rather than a necessary evil.
Floating panel construction works for contemporary designs that need something different. Inset the panel into a frame using a tongue-and-groove joint that allows lateral movement. The groove is wider than the tongue, leaving 1/8-inch clearance on each side. As the panel moves, the joint accommodates it without stress. No glue on the face of the panel — only the tongue is glued into the frame.
Slat construction — think tabletop as a series of 2–3 inch strips running the length, with intentional 1/8-inch gaps between them — lets movement happen visibly and regularly. Each slat moves independently. This requires a solid apron to tie the structure together, but it’s genuinely problem-free for seasonal movement. I’ve used this on several live-edge resin tables with great results.
The core rule: never glue panels edge-to-edge across the grain. This is the mistake that cascades into cupping, cracking, and unbridgeable gaps. When you glue them, they’re locked together. When humidity changes, one wants to expand and the other resists. The glue joint is now under tension. Something will give — usually the wood at the weakest point, which is often the panel edge or a nearby board.
How to Prevent Gaps in Your Next Build
These strategies compound. Small choices upstream eliminate problems downstream.
Select stable species — oak and ash move significantly. Walnut and cherry are more stable. Teak is extremely stable. If a client is building a tabletop in Florida (high humidity) or Denver (extremely dry), stable species matter. I charge more for walnut tabletops partly because they require less finishing adjustment than oak.
Acclimate your wood before you mill it. Store rough lumber in your workshop for 2–4 weeks before milling. This lets the wood come into equilibrium with your shop’s humidity. If you mill lumber that was stored in a kiln-dry warehouse environment then immediately glue it, it will swell in your humid shop after assembly. Gaps appear within days — I’ve seen this happen.
Control humidity during storage and assembly — aim for 35–45% relative humidity in your workshop. This is not furniture-museum-level precision, but a basic hygrometer costs $20 and tells you when you’re drifting. I keep my shop humidity between 40–45% year-round using a simple humidifier in winter.
Plan grain direction so all panels run grain in the same direction on the table surface. This means they expand and contract uniformly. Alternating grain direction looks nice but guarantees movement stress at every joint.
Choose joinery wisely — mortise-and-tenon joinery with breadboard ends beats tongue-and-groove floating panels, which beats edge-glued solid panels. Each method allows progressively more movement accommodation. Don’t make my mistake of thinking solid panels always work.
Document your process for clients so they understand. Show them humidity-movement charts and explain why you chose breadboard ends or floating panels. They’ll understand that gaps are not a failure — they’re evidence of proper design. Client confidence is worth as much as good woodworking.
“`

Stay in the loop
Get the latest artisan furniture makers updates delivered to your inbox.