The Real Reasons Glue Joints Let Go
Glue joint failure has changed quite a bit thanks to the misinformation flying around. Everyone blames the glue. The glue is almost never the problem. As someone who has spent years deliberately breaking my own work to understand why, I picked up the practical knowledge of what actually wrecks a joint. Today, I will share it all with you.
Someone walks into my workshop with a cutting board split clean along the glue line. They’re certain they got a bad batch of Titebond. Nine times out of ten, that bottle is fine. The real culprit is hiding somewhere in the process — invisible once the joint is assembled, which is exactly what makes it so maddening.
Most failures are preventable. Not every single one, but most. There are three main categories worth understanding: surface prep problems, clamping errors, and environmental conditions. None of them are exciting. All of them matter.
Surface Prep Mistakes That Starve the Joint
But what is a starved joint? In essence, it’s a glue line that looks solid but is mechanically hollow — the glue never actually bonded with the wood fibers underneath. But it’s much more than just skipping prep work. It’s subtler than that, and that’s what makes it so dangerous.
Wood glue doesn’t fill gaps. It forms mechanical bonds with fibers on both mating surfaces. Sealed fibers, burnished fibers, dusty fibers — none of those accept glue properly. The joint looks assembled. It isn’t really.
Case hardening is probably the sneakiest version of this problem. Frustrated by a string of joints that kept splitting cleanly down the glue line, I started obsessively tracking my process — and eventually traced it back to timing. I had planed a panel on a Tuesday, then glued it up Thursday morning. Surface looked perfect. Three weeks later it split like I’d scored it with a knife. That was 2019, and I’ve never waited more than an hour between jointing and gluing since. Learn from what tripped me up.
Planer burnishing creates the same issue without the waiting period. A dull blade — and I’m talking a blade that’s done maybe 200 board feet on hard maple — doesn’t cut fibers cleanly. It smears them. Here’s an easy check: drag your fingernail lightly across the prepared surface. Glass-smooth means burnished. You want a faint fuzziness under your nail, fibers standing up, ready to grab.
End grain is its own beast. It’s far more porous than edge or face grain, so it drinks glue faster and deeper — unevenly, which weakens the joint. I size end grain first with a 10:1 dilution of glue to water, let it tack up for about 90 seconds, then apply a full coat. Others just double-coat it. Either works. Ignoring it entirely? That’s a joint that fails under load.
Dust matters more than most woodworkers admit, honestly. Sawdust sitting on a glue surface acts as a physical barrier between the adhesive and the wood. Use compressed air or a clean brush immediately before assembly — not an hour before. Dust settles fast in a working shop.
Clamping Pressure — Too Little and Too Much
The piece that matters most here, because over-clamping has wrecked more joints in my shop than under-clamping ever has. The whole thing is counterintuitive.
Under-clamping is easy to understand — not enough pressure, not enough contact, weak joint from day one. Over-clamping is trickier. Crank down too hard and you force the glue completely out before it can cure. You’ll see squeeze-out, sure, but squeeze-out alone doesn’t tell the whole story.
What you want is a thin, consistent bead running the entire length of the joint — roughly pencil-lead thickness. That bead tells you glue is present and distributed. I’m apparently a chronic over-clamper, and switching from my old Jorgensen 3700s to lighter-duty Bessey EZS clamps actually helped me dial back pressure. The Besseys work for me while the Jorgenssens never gave me enough feedback to stop turning.
For most furniture glue-ups, hand-tight plus a quarter turn is sufficient. A quarter turn — not a full one. Your hands have more feedback than you think. If the surfaces are making contact and that pencil-lead bead is running clean, stop clamping.
Uneven pressure is the silent killer. One end snugged down hard, the other end light — and you get a joint that holds on one side and fails on the other. On a four-foot panel, use at least four clamps distributed evenly. Caul boards help distribute pressure across the full surface, but only if they’re actually flat. Bowed cauls create bowed pressure, which defeats the whole point.
Open Time, Temperature, and Why Timing Matters
Open time is how long glue stays workable after application. Temperature controls it entirely. At 70°F, most water-based woodworking glues — your standard Titebond Original, Titebond II, that kind of thing — give you roughly 15 to 20 minutes. Drop to 60°F and you might get 30. At 50°F the glue gets sluggish and you’re fighting it the whole way.
The real disaster scenario is a complex glue-up — a frame assembly, a multi-piece panel — where you apply glue to the first joint, clamp it, move to the second, move to the third. By the time you reach joint four or five, the glue on joint one is skinning over. Wood fibers haven’t absorbed it yet. That joint is compromised before you finish assembling the piece.
The fix is almost embarrassingly simple: warm your shop before complex assemblies. I keep a 1,500-watt Lasko space heater running until the shop hits 75°F during winter glue-ups. That’s maybe $0.18 per hour in electricity — at least if you’re on standard residential rates in the Midwest. It extends open time, keeps the glue flowing smoothly, and makes the whole process less stressful.
Humidity during cure matters too. Wood moves as it gains or loses moisture. A spike in shop humidity right after clamping causes the wood to swell while the glue is still curing — internal stress right from the start. A drop does the same thing in the other direction. Neither kills a joint outright, but both weaken it. Reasonably stable conditions are enough. Perfectly stable is unrealistic in most shops.
How to Test a Joint Before It Goes Into Your Project
While you won’t need a materials science lab, you will need a handful of scrap pieces and an extra hour of patience — at least if you want to know whether your technique is actually working.
First, you should always dry-fit before applying any glue — at least if you care about catching gaps, rocking, or uneven pressure before it’s too late. Clamp the pieces without glue. Look hard. Fix what you see.
The break test might be the best option, as glue joint verification requires actually breaking something. That is because a joint that looks fine can still be failing internally, and the only way to know is to stress it past its limit. Cut test samples from the same species and board you’re using on the actual project. Glue them using your exact technique — same clamps, same pressure, same temperature, same open time. Wait a full 24 hours minimum, then try to break the joint by hand or with a mallet.
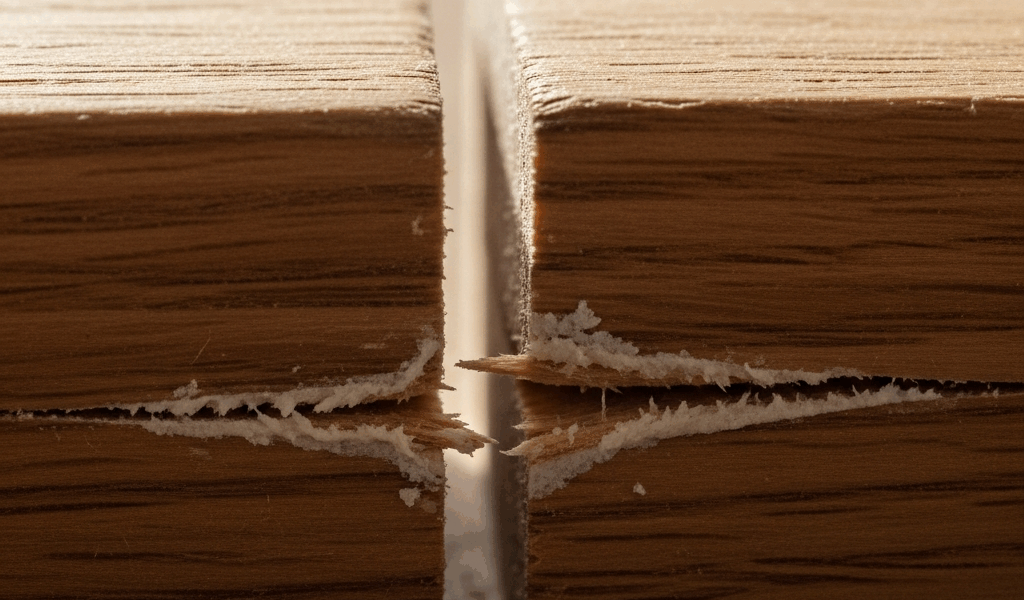
A good joint fails in the wood. Both surfaces show torn fibers. The glue line essentially disappears into the splinter pattern. A bad joint separates cleanly — smooth surfaces, no fiber tear, glue line clearly visible. That clean separation tells you immediately whether the problem is surface prep, clamping, or timing. Adjust one variable. Test again. Do this before building the actual piece.
This new habit of test-first took off several years later in my own practice and eventually evolved into the standard I follow today — the one that keeps finished work from coming back to my shop in pieces. An extra hour on the front end saves months of frustration later. That’s a trade I’ll take every time.


Stay in the loop
Get the latest artisan furniture makers updates delivered to your inbox.