Why Table Legs Go Uneven in the First Place
Wobbly tables have started getting harder to follow with all the bad DIY advice flying around. Sand this leg. Shim that corner. Buy these rubber feet. Most of it skips the one thing that actually matters — figuring out what’s wrong before you start fixing anything.
I inherited a mid-century dining table from my parents about six years ago. Gorgeous piece. Drove me absolutely insane because it rocked every single time I set a coffee cup down. I sanded one leg, then shimmed a different one, then nearly gave up entirely. Turns out I was fixing the wrong leg the whole time. Spare yourself the wrong turn I took.
There are really only three things that make table legs uneven. First: manufacturing variation. Even in a decent woodshop, a 1/8-inch difference between legs happens. Mass-produced furniture makes this worse. One leg gets cut to 28 3/4 inches, another ends up at 28 7/8 inches — looks identical, feels catastrophic once assembled.
Second cause is the floor itself. Most residential floors aren’t actually flat. Wood floors flex. Concrete settles. Tile has grout variation. You notice the wobble and immediately blame the furniture. Sometimes the furniture is perfectly fine and your floor is just doing what floors do.
Third is attachment angle drift — the leg isn’t sitting perpendicular to the apron anymore. Years of movement, seasonal wood expansion, a mortise-and-tenon joint that slowly worked itself loose. It happens gradually enough that you don’t notice until the wobble gets bad.
Skip diagnosis and you’ll sand a perfectly good leg. Or spend $30 on leveling feet when your floor was never the problem to begin with.
How to Find the Leg That Is Actually the Problem
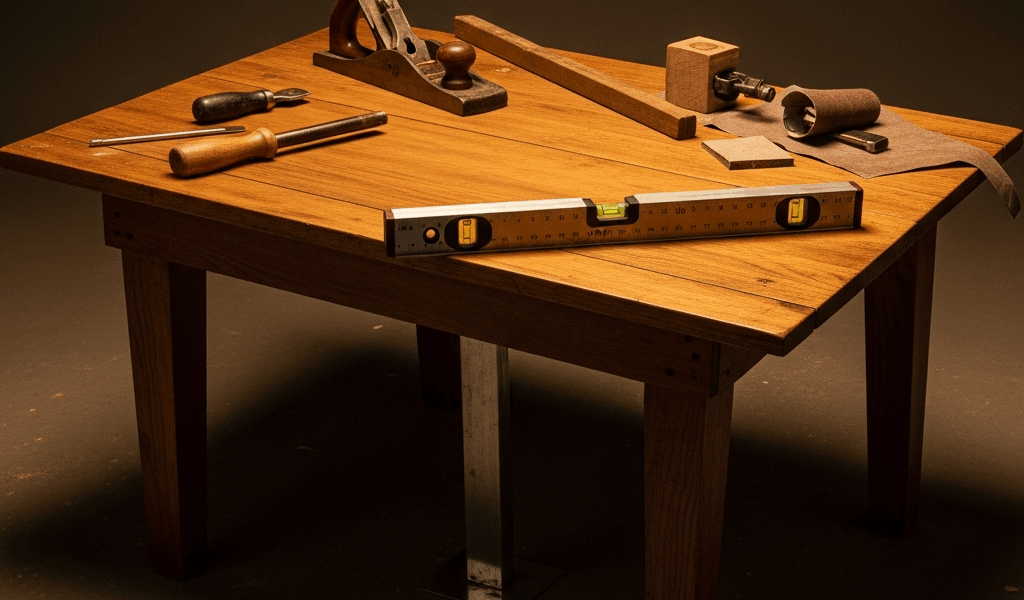
Important part first. You need a flat reference surface and maybe ten minutes.
Move the table to the most level spot in your home. Bathroom tile floor is usually your best bet. Kitchen counter works too. Set all four legs down naturally — no forcing, no tilting — and let the table settle.
Lay a long straightedge across the tabletop running front to back. A quality level works perfectly here. A 24-inch metal ruler works if that’s what you’ve got. Look for gaps between the edge and the surface. Then rotate it 90 degrees and repeat side to side.
You’ll see daylight under one end. That’s your problem area — maybe the back-left corner, maybe the front-right. Put a piece of painter’s tape on that corner immediately. That single step eliminates roughly 80 percent of the guesswork.
Next, use winding sticks. The term sounds archaic — it’s pulled straight from 18th-century joinery — but it works better than anything modern. Two thin straight boards laid parallel across the tabletop reveal twist instantly. Sight across both from above. If they look parallel, no twist. If they diverge, the leg near the low side is your culprit.
Then grab your level and check each leg individually for plumb. Hold it flat against the leg’s face. Bubble off-center means the leg is angled — that’s your attachment drift right there.
Mark the offending leg with tape before touching anything. I’m apparently someone who marks three different legs, loses track, and makes everything worse halfway through. Write the leg position on paper if you need to. Sounds silly. Prevents real disasters.
Fixing Legs That Were Cut Too Short
A leg that’s genuinely shorter than the others needs material added. Two approaches exist — one modern, one traditional, and they suit different tables differently.
The modern solution is a threaded leveling foot. You drill an insert into the leg bottom and thread the foot in. For M10 metric feet, you’re drilling 1/2-inch holes. For 5/16″ UNC imperial feet, you want 3/8-inch holes. Forstner bits give the cleanest result. Woodcraft and Home Depot both stock the inserts — figure $3 to $8 per foot, nothing unreasonable.
Drill one inch deep, press the insert in with a rubber mallet, thread in the foot, adjust until level. Done. Zero maintenance required afterward. The aesthetic question is real, though. Leveling feet on a modern kitchen table look intentional. Leveling feet on a 1960s credenza look frankly wrong. Know your table before you commit.
The traditional approach is a glued-on hardwood pad. Cut a piece of oak or maple to 1.5 inches square, between 1/4 and 3/8 inch thick depending on how much height you need. Sand the bottom slightly concave — a 1/16-inch curve pulls the load off the edges and stops rocking. Glue it down with hide glue or Titebond III, clamp it for 24 hours, done. Invisible when finished. Completely authentic-looking. The downside is commitment — removing it later damages the leg.
Before either approach, measure what you actually need. Shim under the short leg until your straightedge reads level, then count the shim stack thickness. That’s your target — go 1/64 inch thicker to account for wood settling over time.
Fixing Legs That Were Cut Too Long
Trimming requires precision. An angled cut makes wobbling worse, not better — so the setup matters more than the actual cutting.
First, figure out exactly how much to remove. Shim the other three legs up until they match the long leg’s contact point. Measure the shim stack thickness. Subtract another 1/64 inch for settling. That number is what you’re taking off.
Build a simple cutting guide from a piece of hardboard. Cut one straight edge on it, clamp it to the leg exactly where your cut needs to land. The guide keeps the saw from drifting and ensures the bottom face stays square to the leg sides. Takes five minutes to set up and saves you from a ruined leg.
A Japanese pull saw is probably the best option here, as trimming table legs requires a clean, controlled cut. That is because any tearout or drift on the bottom face creates new pressure points that bring the wobble right back. Fine-toothed hand saws work too. Power tools cut faster but forgive nothing — a 1/8-inch error with a circular saw feels permanent in a way that a hand saw error doesn’t.
For very small removals under 1/16 inch, skip the saw entirely. Glue 220-grit sandpaper to a flat piece of plywood, set the leg on top, and sand the bottom flat. Five minutes. No risk of overcutting.
Sand the leg bottom smooth after any trimming. Splinters and rough spots concentrate pressure unevenly and recreate the wobble you just spent an hour fixing.
When the Problem Is the Floor, Not the Furniture
You’ve run the straightedge test from multiple angles. You’ve checked every leg for plumb. Everything measures square. The table still rocks.
Your floor is uneven. This is genuinely common — not a reflection on your home, just physics. Wood floors flex with humidity. Concrete floors settle over decades. Tile floors have grout lines that create subtle variation across a four-foot span.
Confirm it before touching the furniture. Set your level directly on the floor, running it in the direction of the wobble. Bubble off-center? The floor is your problem.
While you won’t need to rebuild anything, you will need a set of adjustable leveling glides — threaded feet with locking nuts that let you dial in compensation for whatever slope your floor is running. Install them on all four legs, screw each one in or out until the straightedge reads level, lock the nuts. Done.
In 2019, I moved a hand-planed walnut table — Benchcrafted hardware, white oak top, roughly 200 pounds fully assembled — into a 1952 bungalow with a floor that sloped almost 3/4 inch across the dining room. Leveling glides from Rockler, about $12 for a set of four, saved that table from completely unnecessary modification.
That’s what makes proper diagnosis endearing to us woodworkers — the fix is almost always simpler than the damage caused by skipping it. Your table doesn’t have a flaw. Your floor does. So, without further ado, treat them accordingly.


Stay in the loop
Get the latest artisan furniture makers updates delivered to your inbox.